Converting LDD to Real Life LEGO Builds: A Complete Guide
Advertisements
Converting LEGO Digital Designer (LDD) models to real-life LEGO builds involves meticulous planning, accurate part sourcing, and careful assembly to bring digital creations to tangible form.
Have you ever spent hours perfecting a digital LEGO model in LEGO Digital Designer (LDD) and then wished you could hold that creation in your hands? The journey from a virtual design to a tangible brick-built masterpiece is incredibly rewarding, but it can seem daunting at first. This guide will walk you through every step of Converting Lego Digital Designer (LDD) to Real Life Builds, transforming your digital dreams into physical reality.
Anúncios
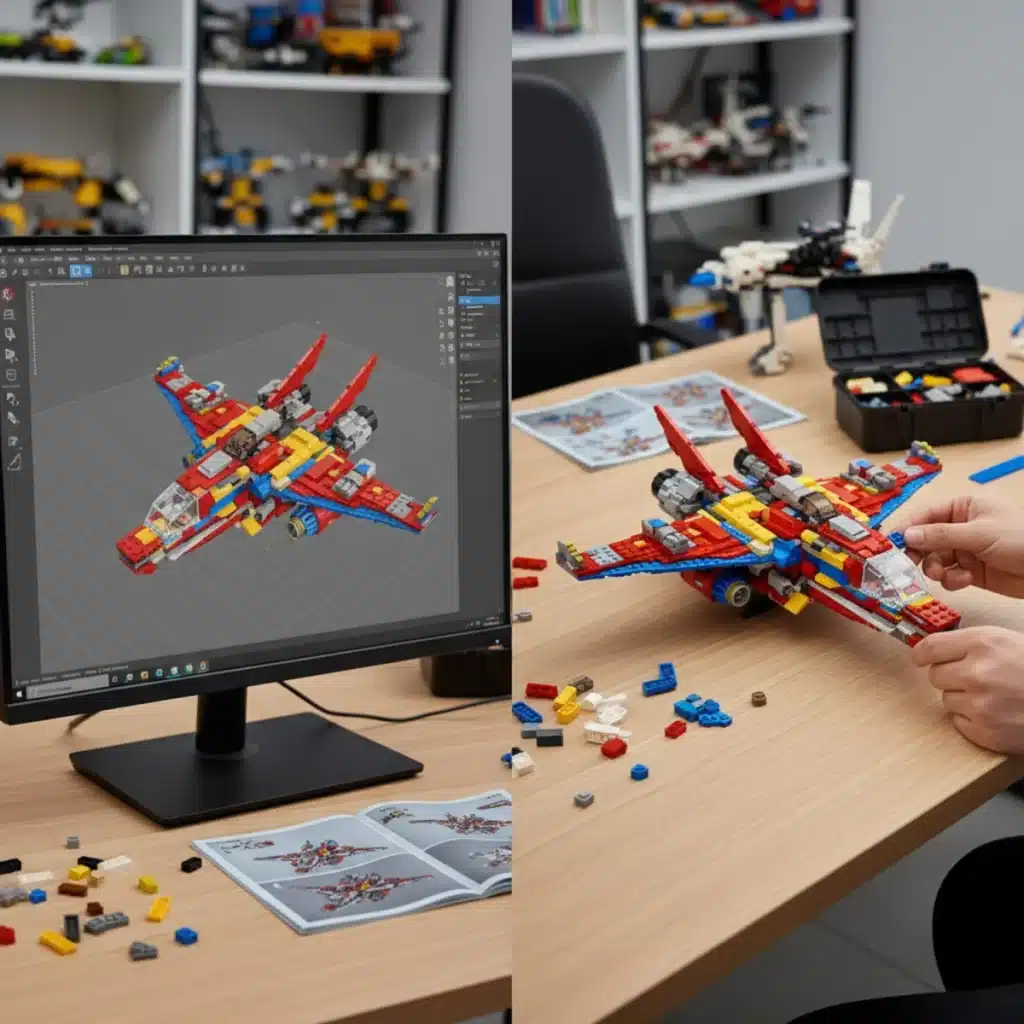
Understanding the Transition: Digital to Physical
The leap from a digital LEGO model to a physical one is more than just gathering bricks; it’s a process that requires attention to detail, patience, and a bit of planning. LDD offers unparalleled freedom in design, allowing builders to experiment with colors and pieces that might not be readily available in the real world or in an affordable quantity. This initial freedom is what makes LDD such a powerful tool for creativity.
However, when you decide to build your model physically, these freedoms introduce challenges. Real-world brick availability, color accuracy, and structural integrity become paramount concerns. The digital environment forgives impossible connections or gravity-defying structures, but reality does not. Understanding these fundamental differences is the first step toward a successful conversion.
Anúncios
The LDD Advantage: Creativity Unleashed
LDD allows for limitless experimentation without the cost or clutter of physical bricks. Builders can:
- Design complex structures without physical limitations.
- Experiment with rare or unique brick colors and types.
- Quickly iterate on designs and make changes.
This digital sandbox is perfect for bringing wild ideas to life, but it’s crucial to remember that its virtual nature doesn’t always translate directly to the physical world without some adjustments. The joy of LDD lies in its creative freedom; the challenge of conversion lies in adapting that freedom to physical constraints.
Ultimately, the transition from digital to physical is about bridging two distinct worlds. One is a realm of infinite possibilities, while the other is governed by the laws of physics and the realities of brick manufacturing and availability. Approaching this with a clear understanding of both environments will set you up for success in bringing your LDD creations to life.
Exporting Your LDD Model and Generating a Parts List
Once your LDD model is complete and you’re ready to bring it into the real world, the first practical step is to export your design and generate an accurate parts list. This list will be your shopping guide, detailing every brick, plate, and tile you need. LDD provides built-in functionalities to help with this, making the initial data collection straightforward.
The accuracy of your parts list is critical. Any discrepancies here can lead to missing pieces, incorrect colors, or even structural issues in your final physical model. Taking the time to double-check this step will save you significant frustration later on.
Using LDD’s Built-in Features for Export
LDD has a feature called ‘Building Guide Mode’ which can generate instructions and a parts list. While useful, it’s often more efficient to export a Bill of Materials (BOM) for purchasing. You can typically export your design in various formats, but for brick ordering, a simple CSV or XML file is usually best.
- Exporting BOM: Navigate to the ‘File’ menu, then ‘Export BOM’. This will give you a list of all bricks, their quantities, and their ID numbers.
- Checking for Obscure Parts: Pay close attention to any parts that seem unusual or are in rare colors. These might be difficult or expensive to source in the real world.
- Reviewing Color Codes: LDD’s color palette can sometimes differ slightly from actual LEGO brick colors. Cross-reference LDD color names with official LEGO color names to avoid surprises.
Generating a precise parts list is the backbone of your conversion project. It dictates what you need to find and acquire, and a well-organized list will streamline the entire sourcing process. Make sure to save these files in a readily accessible location.
After exporting, it’s a good practice to manually review the list against your LDD model one last time. Sometimes, small pieces can be overlooked or duplicated in the digital design, and catching these errors now is far easier than realizing them when you’re halfway through building your physical model.
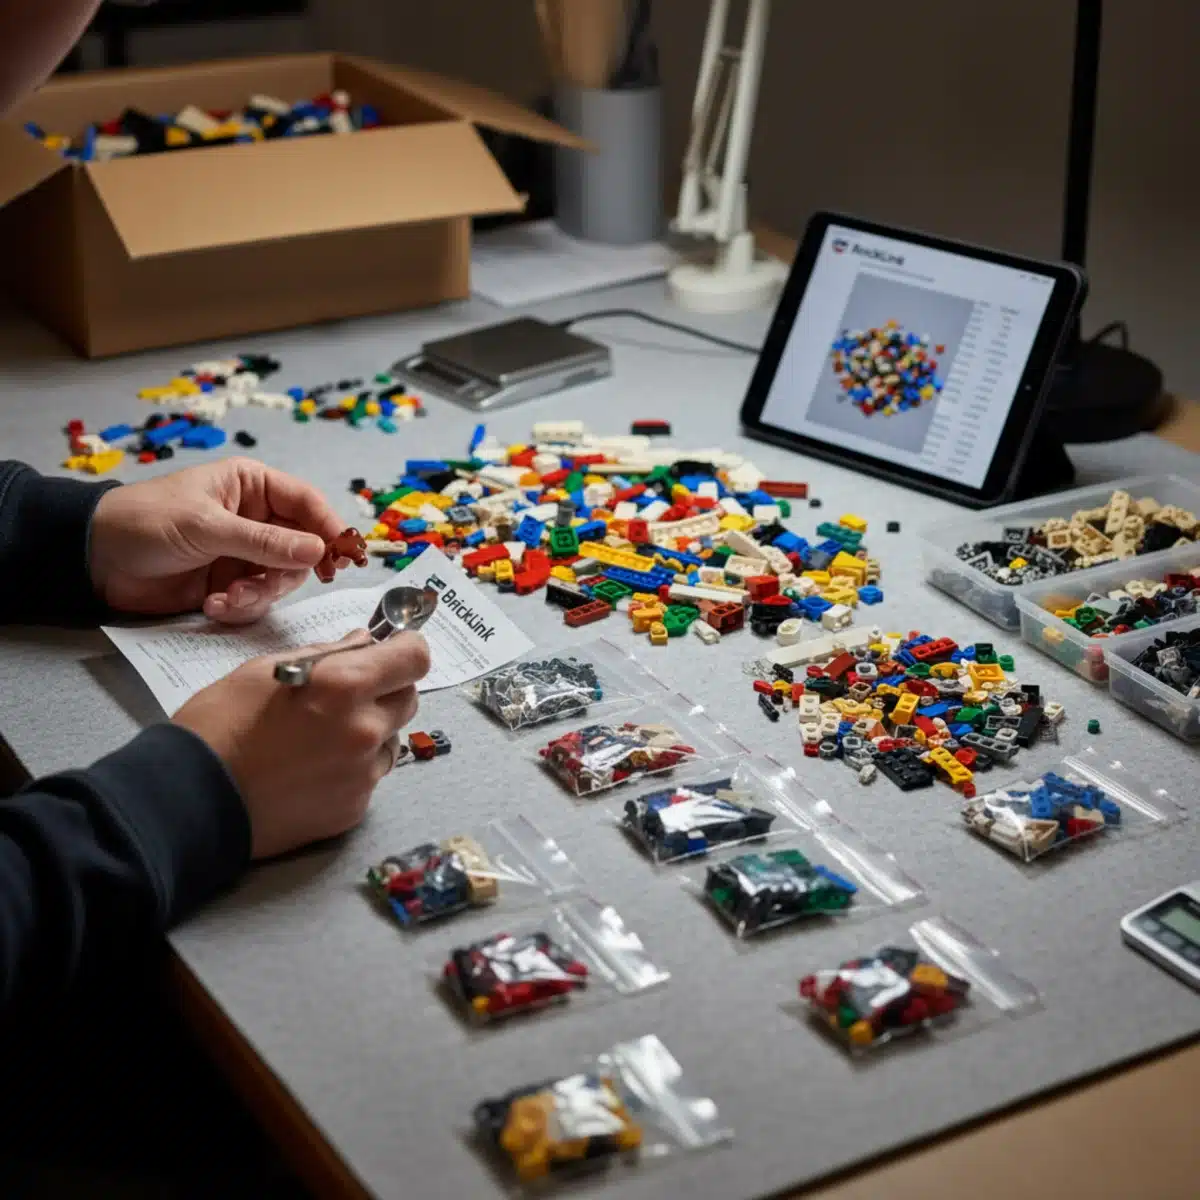
Sourcing Your Bricks: BrickLink and Beyond
With a comprehensive parts list in hand, the next critical phase is sourcing all the necessary LEGO bricks. This is where the digital design truly begins its transformation into a physical object. For many LEGO enthusiasts, BrickLink is the go-to platform, but understanding its nuances and exploring other options can broaden your success.
Sourcing can be a time-consuming part of the process, especially for larger or more complex models with rare parts. Patience and a methodical approach are your best allies here. The goal is to acquire all your parts efficiently and cost-effectively.
Navigating BrickLink: Your Primary Resource
BrickLink is an online marketplace where individuals and businesses sell LEGO parts, sets, and minifigures. It’s essentially the eBay of LEGO, but with highly specialized tools for managing parts lists. To successfully use BrickLink:
- Upload Your BOM: Most BrickLink stores allow you to upload an XML or CSV file directly, which automatically populates your wanted list.
- Utilize the “Wanted List” Feature: Create a wanted list for your project. This allows BrickLink to help you find stores that carry a significant portion of your required parts.
- Compare Store Inventories: BrickLink’s “Buy All” feature can help you identify stores that have the most pieces you need, minimizing shipping costs by consolidating orders.
- Check Seller Ratings: Always review seller feedback and ratings to ensure a reliable purchase experience.
While BrickLink is powerful, it’s not the only option. Sometimes, specific parts might be easier to find through other channels.
Alternative Sourcing Methods
Don’t limit yourself to just one platform. Expanding your search can often yield better results for hard-to-find pieces or better prices:
- LEGO Pick a Brick: LEGO’s official online store offers a “Pick a Brick” service where you can order individual elements. This is often good for common pieces or newly released elements.
- Third-Party Retailers: Some online toy stores or brick-and-mortar hobby shops might carry a selection of individual LEGO parts.
- Local LEGO User Groups (LUGs): Joining a local LUG can open doors to trading or purchasing parts from other enthusiasts. They often have bulk collections or know where to find specific elements.
Sourcing your bricks requires a blend of digital savvy and practical searching. By leveraging BrickLink effectively and exploring alternative avenues, you can assemble all the pieces needed to bring your LDD creation to life. Remember to factor in shipping costs and potential import duties if ordering internationally.
Addressing Discrepancies: Color Matching and Part Substitution
Even with careful planning, you’ll almost certainly encounter discrepancies between your LDD design and real-world brick availability. This is a normal part of the Converting Lego Digital Designer (LDD) to Real Life Builds process. The key is to be adaptable and resourceful, finding suitable alternatives without compromising your model’s vision.
Color matching can be particularly tricky, as LDD’s digital palette doesn’t always perfectly align with physical LEGO colors. Part substitution, on the other hand, involves finding functionally similar bricks when an exact match isn’t available.
Navigating Color Differences
LDD’s colors can sometimes be approximations or include shades that LEGO no longer produces. Here’s how to address this:
- Consult Official Color Charts: Refer to BrickLink’s comprehensive color guide or other official LEGO color charts to find the closest real-world equivalents.
- Embrace Creative Alternatives: Sometimes a slightly different shade can add character. For example, if a specific dark gray is unavailable, a light gray might still work with the overall aesthetic.
- Consider Rarity: Extremely rare or expensive colors might necessitate a complete color scheme adjustment for that section of your build.
Don’t be afraid to make aesthetic compromises if they significantly reduce cost or increase feasibility. A slightly different shade of blue might still look fantastic if the original is prohibitively expensive.
Smart Part Substitution Strategies
When a specific part isn’t available or is too costly, substitution becomes essential. This requires a good understanding of LEGO geometry and structural principles:
- Functional Equivalence: Look for parts that serve the same purpose. A 1×4 plate might be substituted with two 1×2 plates, or a specific bracket with another type that achieves the same connection.
- Structural Integrity: Ensure that any substituted parts maintain the structural integrity of your model. A fragile connection in LDD might be fine, but in physical form, it could lead to collapse.
- Aesthetic Impact: Consider how the substituted part will look. Can it be hidden, or will it be a prominent feature? Sometimes, a slight change in a visible part can alter the model’s overall appearance.
- Software Tools: Some LEGO CAD programs (like Stud.io) offer tools to suggest alternative parts. While LDD doesn’t have this, manual exploration on BrickLink can often reveal options.
Mastering color matching and part substitution is a skill developed through practice. It involves a blend of creativity and technical understanding, ensuring that your physical model remains true to your vision while adapting to the realities of brick availability. This adaptability is a hallmark of experienced LEGO builders.
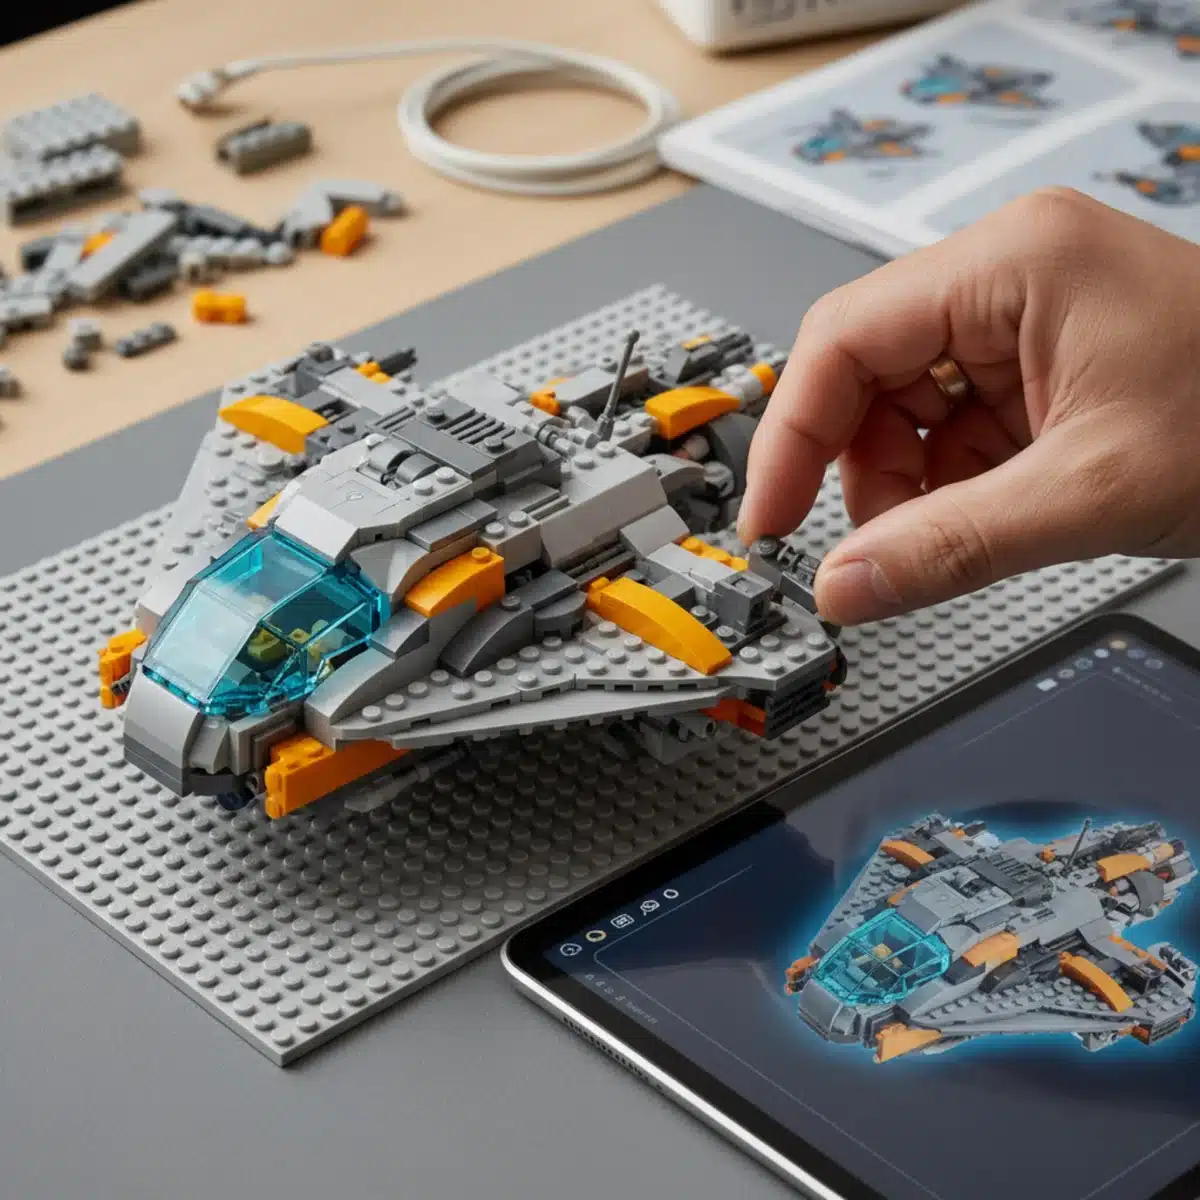
Building Your Model: Tips for Assembly and Structural Integrity
With all your bricks gathered, the exciting part begins: physically assembling your LDD creation. This phase requires patience, precision, and an eye for structural stability. Unlike the digital realm where gravity and physics are mere suggestions, your real-life model must stand on its own.
The instructions generated by LDD can be a valuable guide, but sometimes you’ll need to deviate or reinforce sections to ensure your model is robust. Think like an engineer as you build, anticipating potential weak points.
Following LDD Instructions (and Knowing When to Deviate)
LDD’s Building Guide Mode generates step-by-step instructions that are generally helpful. However, they are optimized for digital assembly, not always for physical stability or ease of building:
- Step-by-Step Guidance: Use the LDD instructions as a primary reference for piece placement and build order.
- Identify Weak Points: As you build, consciously look for areas that feel flimsy or might not hold up to handling. These are prime candidates for reinforcement.
- Modular Building: For complex models, consider building in sub-assemblies. This makes handling easier and allows you to test the stability of smaller sections before integrating them into the larger model.
Don’t be afraid to pause and reconsider a step if it feels unstable. Sometimes, a slight reordering of steps or the addition of a hidden reinforcement can make a huge difference.
Ensuring Structural Integrity
Physical models need to withstand gravity, handling, and sometimes even playful interaction. Reinforcing your model is crucial:
- Interlocking Bricks: Always strive for maximal interlocking of bricks. Avoid stacking plates directly on top of each other without staggering them, as this creates weak seams.
- Internal Support: For large or tall structures, consider adding internal bracing, Technic pins, or even a hidden Technic frame to provide core strength.
- Weight Distribution: Distribute the weight of your model evenly. Heavy sections should ideally be supported from below, not cantilevered precariously.
- Glue (As a Last Resort): For display models that will not be disassembled, some builders use plastic cement. However, this is generally discouraged for LEGO as it makes future modifications impossible and diminishes the reusability of bricks.
Building from LDD to real life is a hands-on learning experience. Each model presents its unique challenges, and overcoming them strengthens your building skills. Enjoy the process of seeing your digital design take tangible form, piece by careful piece.
Documenting Your Real-Life Build and Sharing Your Creation
After successfully bringing your LDD model to life, the journey doesn’t end there. Documenting your real-life build and sharing it with the wider LEGO community is an integral part of the creative process. It allows you to showcase your achievement, inspire others, and even get valuable feedback for future projects.
High-quality documentation not only preserves your work but also makes it accessible to others who might be interested in your design or the conversion process you undertook. This is especially true for custom creations, or MOCs (My Own Creations).
Capturing Your Masterpiece: Photography Tips
Good photos can make your creation shine. Even with a smartphone camera, you can achieve impressive results:
- Good Lighting: Natural, diffused light is often best. Avoid harsh direct sunlight or dark, shadowy areas.
- Clean Background: Use a plain, uncluttered background that allows your model to be the focal point. A white or black sheet works wonders.
- Multiple Angles: Take photos from various angles – front, back, sides, and even close-ups of interesting details or unique building techniques.
- Scale Reference: Include a known object (like a minifigure or a common LEGO brick) in some shots to give viewers a sense of scale.
Consider taking a few photos during the building process as well. These can be fascinating for others to see the evolution of your model from a pile of bricks to a finished piece.
Sharing Your Work with the Community
The LEGO community is vast and welcoming. There are many platforms where you can share your real-life LDD conversions:
- Flickr: A popular platform for LEGO photographers to share high-resolution images of their MOCs.
- Reddit (r/lego, r/legomoc): Active subreddits where you can post your creations and interact with other builders.
- LEGO Fan Sites and Forums: Many dedicated LEGO websites and forums exist specifically for sharing and discussing custom builds.
- Social Media: Platforms like Instagram or X (formerly Twitter) are great for quick shares and reaching a broad audience. Use relevant hashtags like #legomoc, #ldd, #legobuilds.
Sharing your work not only brings recognition but also fosters connection within the community. You might inspire someone else to take the plunge and convert their own LDD designs, or receive constructive criticism that helps you grow as a builder. The act of sharing completes the creative cycle, bringing your digital vision full circle into the public eye.
Advanced Techniques and Future Possibilities
Once you’ve mastered the basics of Converting Lego Digital Designer (LDD) to Real Life Builds, a world of advanced techniques and exciting future possibilities opens up. The journey from digital to physical LEGO is constantly evolving, with new tools and methods emerging to enhance the building experience.
Pushing the boundaries involves more intricate planning, leveraging specialized software, and even exploring custom solutions for truly unique creations. This section delves into how experienced builders refine their process and what the future might hold.
Optimizing Your Digital Design for Physicality
Beyond basic structural integrity, advanced builders often optimize their LDD designs specifically for real-world construction:
- Stud.io Integration: Many builders now transition their LDD files to BrickLink’s Stud.io. Stud.io offers more robust stability analysis, better rendering, and direct integration with BrickLink for easier parts ordering. It can also identify illegal connections that might appear fine in LDD but are impossible in real life.
- Sub-Assembly Planning: For extremely large or complex models, planning the build in distinct, manageable sub-assemblies within the digital file can streamline the physical construction process significantly.
- Weight Distribution Analysis: While LDD doesn’t have a built-in weight calculator, experienced designers can visually estimate weight distribution and proactively add internal supports in the digital phase.
Thinking ahead during the digital design phase can save immense time and effort during physical assembly. It’s about designing with the physical constraints in mind from the very beginning.
Beyond Standard Bricks: Customization and Electronics
The world of LEGO MOCs isn’t limited to standard bricks. Advanced projects often incorporate:
- Custom Parts: Some builders design and 3D print custom elements for details not available in official LEGO parts. This requires 3D modeling skills and access to a 3D printer.
- Lighting Kits: Integrating LED lighting kits can bring your models to life, adding a new dimension of realism and visual appeal. Companies like Lightailing or Brickstuff offer specialized kits.
- Motorization (Power Functions/Powered Up): Adding LEGO Power Functions or Powered Up components allows for motorized movement, making static models dynamic and interactive. This requires careful planning for motor placement, wire routing, and battery box integration.
- Custom Decals and Stickers: For highly detailed models, custom-printed decals or stickers can add a level of authenticity and detail that bricks alone cannot achieve.
These advanced techniques transform a simple brick model into a sophisticated, interactive display piece. They require additional skills and resources but elevate the complexity and impressiveness of your real-life LDD conversions significantly. The future of LEGO building is increasingly blending digital design with physical customization and technological integration.
| Key Step | Brief Description |
|---|---|
| Export Parts List | Generate an accurate Bill of Materials (BOM) from LDD to identify all necessary bricks and quantities. |
| Source Bricks | Utilize platforms like BrickLink and LEGO Pick a Brick to acquire all elements on your parts list. |
| Manage Discrepancies | Address color matching and find suitable part substitutions when original parts are unavailable or costly. |
| Assemble with Care | Follow LDD instructions, reinforce weak points, and ensure structural integrity for a stable physical build. |
Frequently Asked Questions About LDD to Real Life Builds
While LEGO Digital Designer (LDD) is no longer officially supported or updated by LEGO, it remains a popular and functional tool for many builders. Its extensive brick library and intuitive interface still make it a valuable choice for digital design, although newer alternatives like BrickLink’s Stud.io offer more modern features and direct integration with brick marketplaces.
The most effective way to get a parts list from LDD is to use its “Export BOM” (Bill of Materials) feature. This generates a CSV or XML file detailing all the bricks, their quantities, and part IDs. This file can then be uploaded directly to BrickLink’s wanted list feature, streamlining the process of finding and purchasing your bricks.
For rare or expensive LEGO parts, start by searching BrickLink extensively, comparing prices from multiple sellers. If unsuccessful, consider LEGO’s official Pick a Brick service for newer parts. Alternatively, explore local LEGO User Groups (LUGs) for trading opportunities or consider substituting the part with a more common or affordable alternative that maintains your model’s aesthetic and structural integrity.
Common challenges include discrepancies in brick availability and color accuracy between LDD and real life, the cost and shipping fees associated with sourcing many individual parts, and ensuring the physical model’s structural integrity. LDD allows for impossible connections or flimsy designs that must be reinforced or redesigned for a stable physical build, requiring careful planning and adaptation.
Yes, LDD’s “Building Guide Mode” generates step-by-step instructions that can be very helpful for assembling your real-life model. However, remember that these instructions are optimized for digital building. You might need to adapt or reinforce certain sections to ensure physical stability, as LDD doesn’t account for real-world physics or brick clutch power. Use them as a guide, but be prepared to make adjustments.
Conclusion
The journey of Converting Lego Digital Designer (LDD) to Real Life Builds is a testament to creativity, problem-solving, and the enduring magic of LEGO. From the initial spark of an idea in the digital realm to the satisfying click of the final brick in a physical model, each step offers unique challenges and immense rewards. This guide has aimed to demystify the process, providing a clear roadmap from virtual design to tangible masterpiece. Embrace the planning, navigate the sourcing, adapt to discrepancies, and build with care. Your efforts will culminate in a unique LEGO creation that is not only a joy to behold but also a proud display of your dedication and skill. Happy building!


