Lego Lighting: Illuminate Your Builds with LEDs for Kids

Advertisements
Lego LED lighting transforms static Lego models into dynamic, illuminated masterpieces, enhancing play and display through easy-to-install kits and creative integration, bringing new life to familiar bricks.
Anúncios
Have you ever looked at your amazing Lego creations and wished they could shine even brighter? Imagine your favorite Lego castle glowing with warm light, or your space shuttle blasting off with pulsating engines. Well, guess what? You can make that happen! With Lego LED lighting, you can bring your builds to life in ways you never thought possible, adding a whole new dimension of fun and creativity.
Why Lighting Up Your Lego Builds is Super Cool
Adding lights to your Lego models isn’t just about making them brighter; it’s about making them more alive and exciting. Think about how movies use lighting to set a mood or highlight important details. You can do the same with your Lego sets! It transforms a static display into a dynamic scene, drawing attention to all the intricate details you worked so hard to create.
Anúncios
Beyond just looking cool, illuminating your Lego builds can spark even more imaginative play. A dimly lit police station feels more mysterious for a nighttime pursuit, and a glowing lighthouse really guides ships through a pretend storm. It’s also a fantastic way to showcase your completed sets, turning them into eye-catching centerpieces in your room.
Enhanced Realism and Storytelling
- Bringing Scenes to Life: Lights can mimic real-world scenarios, like streetlights in a Lego city or headlights on a Lego car.
- Creating Atmosphere: Warm lights can make a Lego house feel cozy, while flashing lights can add excitement to an action scene.
- Highlighting Details: Small, intricate parts of your build become more noticeable when illuminated, showcasing your building skills.
The magic of lighting extends beyond just aesthetics; it delves into the realm of storytelling. When a Lego fire station has flashing red lights, it instantly tells a story of an emergency in progress. A well-placed green light in a Lego forest can suggest an alien presence or a hidden magical element. This added layer of narrative potential makes playing with Lego even more immersive, encouraging kids to invent richer and more complex adventures for their minifigures.
Ultimately, lighting up your Lego builds is about taking your creativity to the next level. It’s an opportunity to experiment with different colors, effects, and placements to achieve exactly the look and feel you want for your models. It’s a journey of discovery that adds immense value to your Lego hobby.
Getting Started with Lego Lighting Kits
So, you’re ready to make your Lego glow? Awesome! The easiest way to begin is by using specialized Lego lighting kits. These kits are designed specifically for Lego bricks, meaning they often come with tiny lights and thin wires that can be easily hidden within your existing builds. You don’t need to be an electronics expert to use them; many are plug-and-play, making the process straightforward and fun.
When choosing a kit, you’ll find options tailored for specific Lego sets, like a Hogwarts Castle or a Millennium Falcon, which include instructions for exact placement. There are also universal kits with various types of lights that you can adapt to any creation. Always make sure to check the kit’s compatibility and what it includes before you buy, so you know exactly what you’re getting.
Choosing the Right Kit
- Set-Specific Kits: These kits are designed for particular Lego sets, often including custom-sized lights and detailed instructions.
- Universal Kits: More flexible, offering a variety of lights (strip lights, dot lights, flickering lights) that can be adapted to many builds.
- Power Source: Most kits are powered by USB or small battery packs, which are usually included or easily purchased.
Before you even open the box, it’s a good idea to have a rough plan for where you want your lights to go. Think about what parts of your Lego model you want to emphasize. Do you want lights inside a building, on a vehicle, or perhaps to create a glowing effect around a minifigure? Having a clear vision will help you choose the right types of lights and make the installation process smoother.
Remember, the goal is to enhance your build, not to overwhelm it. Start with a few lights and see how they look. You can always add more later if you feel your creation needs extra illumination. The journey of lighting up your Lego is as much a part of the creative process as the building itself.
Installation Tips for Young Builders
Installing LED lights into your Lego builds might sound a bit tricky, but it’s actually a super rewarding process! The key is to be patient and follow some simple steps. Most lighting kits come with clear instructions, and many even have video tutorials online, which can be really helpful. Always ask an adult for help if you’re unsure about anything, especially when dealing with batteries or connecting wires.
One of the most important things is to make sure your wires are hidden. This makes your illuminated Lego model look much neater and more professional. Thin wires can often be tucked between studs, under plates, or run through hollow bricks. Sometimes you might need to slightly disassemble a part of your Lego build to thread a wire through, but don’t worry, you can always put it back together!

Step-by-Step Guidance
- Plan Your Layout: Before starting, decide where each light will go. This prevents unnecessary re-wiring.
- Gentle Disassembly: Carefully remove any Lego pieces necessary to access the interior of your build for wire routing.
- Route Wires Neatly: Use the gaps between studs, under plates, or inside hollow bricks to hide wires.
- Test as You Go: Connect the lights to the power source periodically to ensure they are working before fully reassembling.
- Secure Connections: Make sure all connectors are firmly pushed together to prevent flickering or loose lights.
Another great tip is to use a small tool, like a Lego brick separator or even your fingernail, to gently lift plates or bricks if you need to run a wire underneath. Avoid forcing wires into tight spaces, as this can damage them. If a wire seems too short, consider if there’s a different path you can take, or if you need an extension cable, which some kits provide.
When you’re done, take a step back and admire your work! The satisfaction of seeing your Lego creation glow with your own hands-on effort is truly special. It teaches you problem-solving skills and attention to detail, all while having a blast.
Creative Ideas for Illuminating Different Lego Themes
The beauty of Lego LED lighting is that it can enhance almost any Lego theme. Whether you’re a fan of bustling cityscapes, epic space adventures, or ancient castles, there’s a lighting solution that can bring your vision to life. The trick is to think about the natural light sources within that theme and how you can replicate them with LEDs.
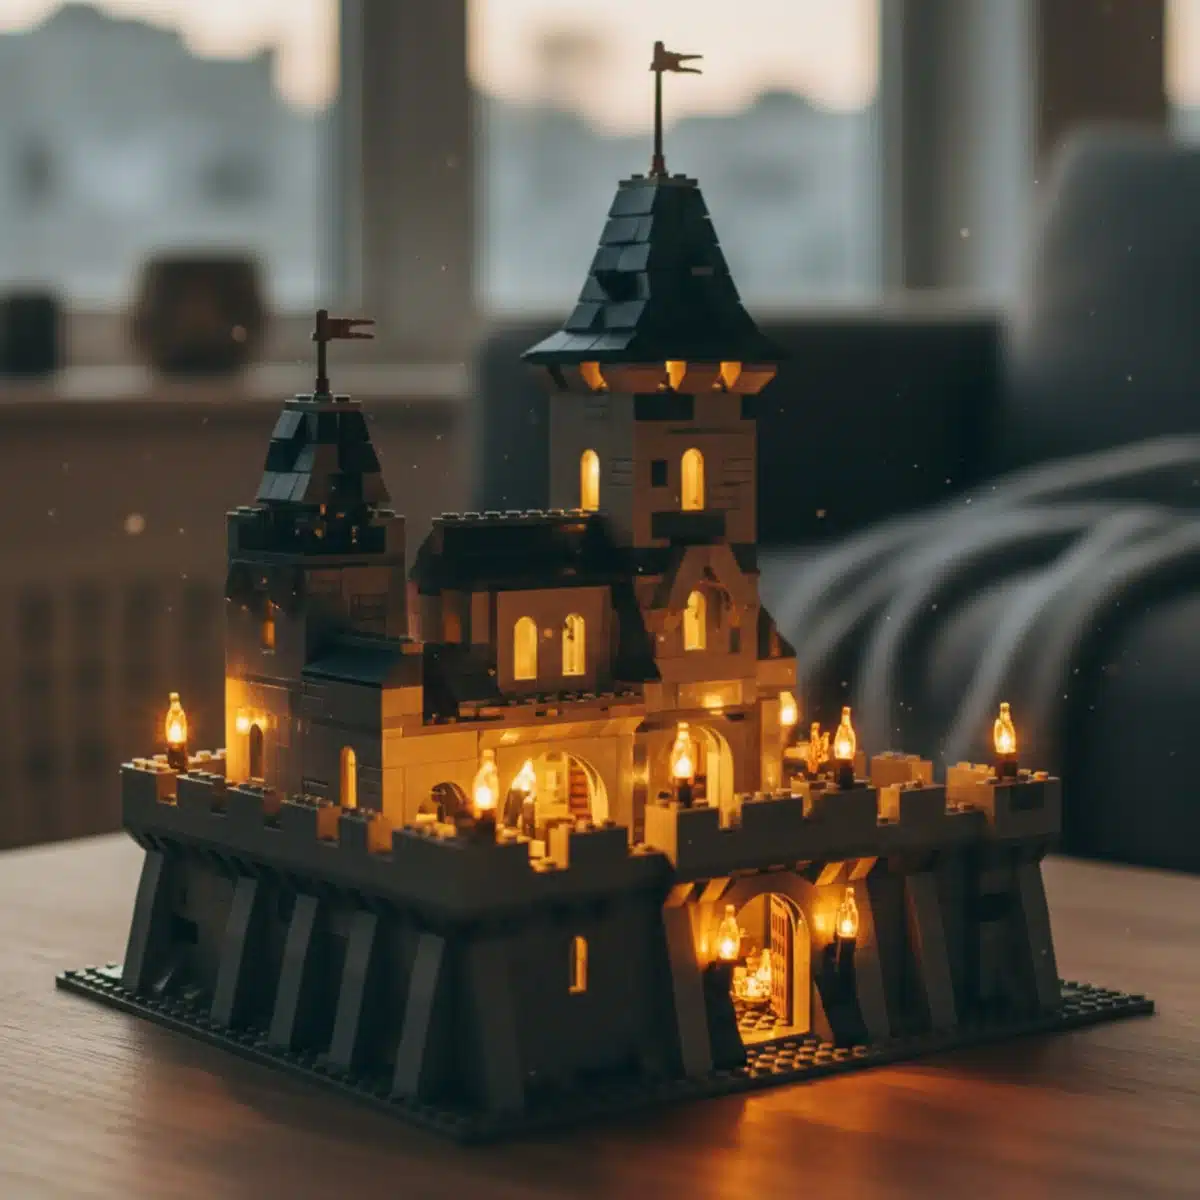
For city builds, think about streetlights, traffic signals, and the glowing windows of buildings. For space sets, imagine the fiery glow of rocket engines, the navigation lights of a spaceship, or the eerie light inside an alien base. Castles can benefit from warm, flickering lights to simulate torches or fireplaces, creating a cozy yet mysterious medieval atmosphere. Let your imagination run wild!
Theme-Specific Lighting Inspiration
- Lego City: Use warm white for streetlights, red/green for traffic lights, and various colors for shop windows and signs.
- Lego Space: Red or orange for thrusters, blue for cockpit lights, and flashing lights for emergency beacons.
- Lego Castles/Fantasy: Flickering orange LEDs for torches and fireplaces, warm white for interior lighting, and green or purple for magical effects.
- Lego Technic/Vehicles: Headlights, taillights, dashboard lights, and even underglow effects.
Don’t be afraid to mix and match different types of lights. Strip lights can illuminate large areas like building interiors, while small dot lights are perfect for tiny details or specific spots like a minifigure’s lantern. Experiment with different colors to evoke different moods. A cool blue light can make a room feel futuristic, while a soft yellow can make it feel inviting.
Consider the overall story you want your Lego build to tell. Does it happen during the day or night? Is it a calm scene or an action-packed moment? The lighting you choose can dramatically influence how your story is perceived. This creative exploration is what makes Lego lighting such a powerful tool for builders of all ages.
Beyond the Basics: Advanced Lighting Techniques
Once you’ve mastered the basics of installing LED lighting, you might be ready to explore some more advanced techniques. This is where you can truly make your Lego builds unique and show off your creative flair. Advanced techniques often involve a bit more planning and sometimes require additional components, but the results can be stunning.
One popular advanced technique is using dimmers or effect controllers. These allow you to control the brightness of your lights, make them flicker, or even pulse. Imagine a flickering campfire in your Lego wilderness scene or a pulsating engine on your Lego starship! You can also experiment with light diffusion, using translucent Lego bricks or custom diffusers to soften the light and create a more ambient glow rather than a harsh spot.
Taking Your Lighting to the Next Level
- Dimmers and Controllers: Adjust brightness or create dynamic effects like flickering, pulsing, or fading.
- Light Diffusion: Use translucent Lego bricks or custom materials to spread light evenly and reduce harsh spots.
- Custom Wiring: For experienced builders, creating custom wiring harnesses can offer more control and cleaner integration.
- Sound and Light Integration: Some advanced kits allow you to synchronize lights with sound effects for an even more immersive experience.
Another exciting avenue is exploring programmable lighting systems. While these might be more complex, they allow you to create intricate light sequences and patterns. You could have lights turn on and off in a specific order, or even change colors automatically. This level of customization opens up a world of possibilities for bringing complex scenes to life.
Remember, advanced techniques are a journey, not a destination. Start small, experiment with one new idea at a time, and don’t be afraid to make mistakes. Each attempt teaches you something new and helps you refine your skills. The goal is to have fun and push the boundaries of what you can do with your Lego creations.
Maintaining Your Illuminated Lego Displays
Once you’ve put all that effort into lighting up your Lego builds, you’ll want to keep them looking their best. Proper maintenance ensures your lights continue to shine brightly and your models stay in top condition. This involves a few simple steps that can easily become part of your regular Lego care routine.
Dust is the number one enemy of any display, and illuminated Lego is no exception. Dust can dull the appearance of your bricks and even interfere with the light output. Gently dusting your models regularly with a soft brush or a can of compressed air can make a big difference. Also, check your battery packs or USB connections occasionally to ensure everything is still securely attached and functioning correctly.
Tips for Long-Lasting Brilliance
- Regular Dusting: Use a soft brush or compressed air to keep dust off your bricks and lights.
- Battery Check: If using battery packs, check them periodically and replace batteries when they start to dim.
- Wire Inspection: Ensure all wires are still neatly tucked away and not pinched or damaged.
- Clean Connections: Occasionally, gently unplug and re-plug connections to ensure good contact.
If you notice any lights flickering or not working, the first thing to check is the connections. Sometimes a wire might have come loose. If that doesn’t fix it, try replacing the battery if your kit uses one. Most LED lights are very durable, but occasionally one might burn out, and some kits offer replacement parts or individual lights.
Storing your illuminated Lego models properly is also important. If you need to move them or store them for a while, make sure to disconnect the power source and carefully wrap any loose wires to prevent damage. With a little care, your glowing Lego creations will continue to amaze for a long time.
The Future of Lego Lighting and Beyond
Lego LED lighting is constantly evolving, with new innovations making it even easier and more exciting to illuminate your builds. What started with simple single-color lights has grown into sophisticated systems offering a spectrum of colors, dynamic effects, and even app control. The future promises even more integration and creativity for young builders.
Imagine lights that respond to sound, or kits that can be easily programmed with a simple drag-and-drop interface. As technology advances, we can expect lighting solutions to become even more compact, versatile, and user-friendly, opening up new possibilities for how we interact with our Lego models. This means more creative freedom and even more stunning displays for everyone.
Emerging Trends and Innovations
- Smarter Control: App-controlled lighting allowing for remote adjustments and custom sequences.
- Miniaturization: Even smaller LEDs and thinner wires, making integration almost invisible.
- Interactive Elements: Lights that react to movement, sound, or other sensors within your Lego build.
- Sustainable Power: More efficient power solutions and potentially even solar-powered options for outdoor Lego displays.
Beyond just the lights themselves, we’re seeing more community engagement around Lego lighting. Builders share their illuminated creations online, inspiring others and fostering a vibrant community of light-up Lego enthusiasts. This shared passion drives innovation and pushes the boundaries of what’s possible, ensuring that the world of illuminated Lego continues to grow and amaze.
For any young builder, staying curious about these advancements means being at the forefront of Lego creativity. Keep an eye out for new products and techniques, and don’t be afraid to experiment with the latest innovations. The future of Lego building is bright, and with LED lighting, your creations can lead the way.
| Key Point | Brief Description |
|---|---|
| Enhance Creativity | LED lighting brings Lego builds to life, adding realism and depth to imaginative play and display. |
| Easy Installation | Specialized Lego lighting kits are designed for simple, plug-and-play setup, even for young builders. |
| Themed Illumination | Lights can be tailored to specific Lego themes like city, space, or fantasy for authentic effects. |
| Maintenance Tips | Regular dusting, battery checks, and careful wire management ensure long-lasting illuminated displays. |
Frequently Asked Questions about Lego Lighting
Yes, most Lego LED lighting kits are designed with safety in mind. They typically use low-voltage LEDs and are powered by USB or small battery packs. Always supervise younger children during installation and ensure they follow the kit’s instructions carefully for a safe and enjoyable experience.
Absolutely! While some kits are made for specific Lego sets, many universal lighting kits exist that can be adapted to almost any Lego creation. You might need to get a little creative with wire routing, but the possibilities are endless for illuminating your custom builds or existing sets.
Hiding wires is key for a clean look. You can tuck thin wires between Lego studs, under plates, or run them through hollow bricks. Sometimes, carefully disassembling a small section of your build to route the wire and then reassembling it works best. Patience and planning help a lot!
For a Lego castle, warm white LEDs are great for general interior lighting, mimicking candlelight or torches. Flickering orange or red LEDs can create realistic fireplace or torch effects. Small dot lights can highlight architectural details or create a magical glow for fantasy elements, adding to the medieval atmosphere.
Lego lighting kits are available from various online retailers specializing in Lego accessories, as well as some general hobby and toy stores. You can find them by searching online for “Lego LED lighting kits” or “Lego light kits.” Always check reviews and product descriptions before purchasing.
Conclusion
Bringing your Lego creations to life with LED lighting is an incredible way to enhance your building and playing experience. From simple installations to advanced techniques, the world of Lego LED lighting offers endless opportunities for creativity, storytelling, and display. It’s a fantastic venture for any young builder looking to add that extra spark to their favorite models, transforming them from static displays into vibrant, illuminated masterpieces that truly capture the imagination. So go ahead, plug in, light up, and watch your Lego world shine brighter than ever before!


