Building Realistic Landscapes with Lego: A Terrain Guide for Kids
Advertisements
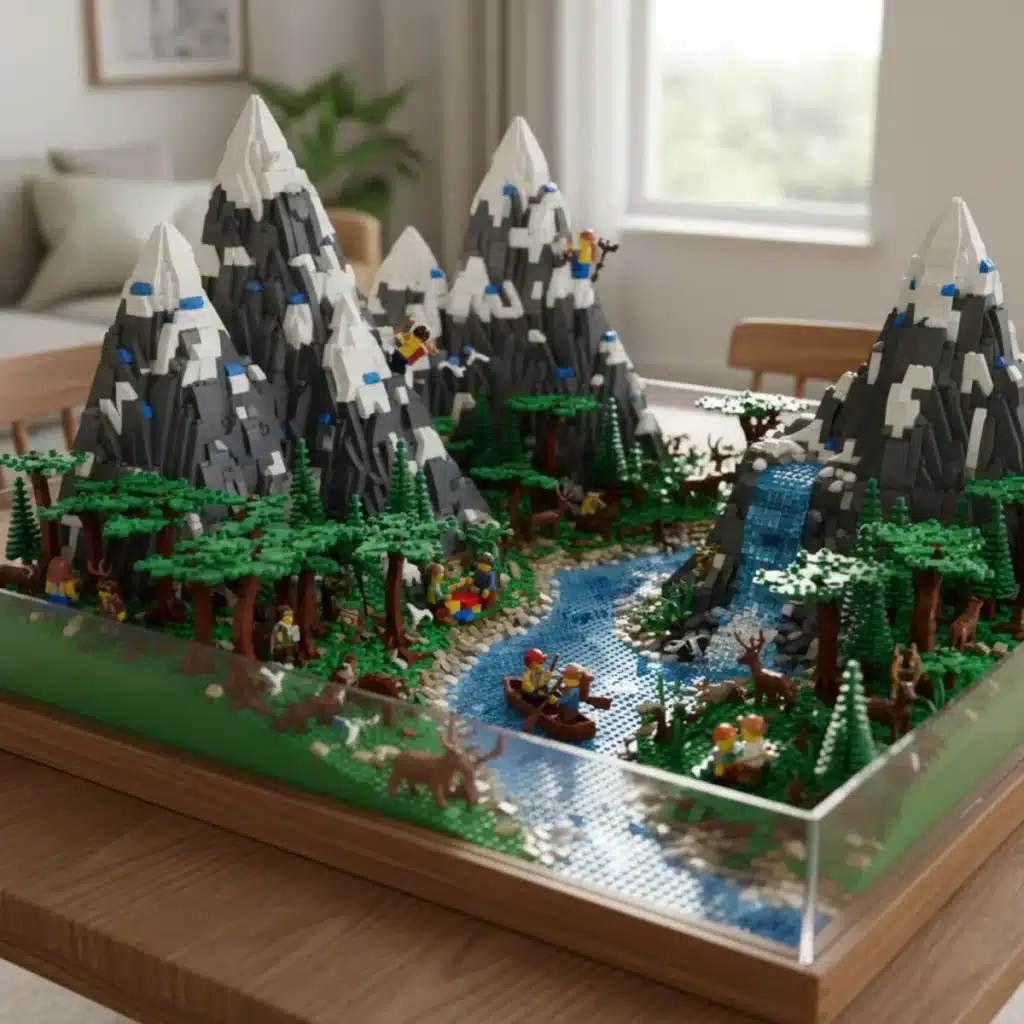
Building realistic Lego landscapes involves mastering various techniques, from selecting appropriate baseplates to incorporating natural elements like water, mountains, and vegetation, transforming simple bricks into immersive, lifelike terrains.
Anúncios
Have you ever dreamed of creating a Lego world that looks so real you could almost step into it? Imagine towering mountains, flowing rivers, and lush forests, all crafted from your favorite bricks. This guide on Lego realistic landscapes will show you how to turn those dreams into reality, making your builds more immersive and exciting than ever before.
Understanding the Basics of Lego Terrain
Before diving into complex structures, it’s essential to grasp the foundational principles of Lego terrain building. This involves understanding how different pieces can simulate natural formations and how to create a sense of depth and scale within your creations. Starting with a solid plan can make a huge difference in the final outcome.
Anúncios
Choosing the right baseplates is often the first step. Green baseplates are perfect for grassy areas, while blue ones are great for water. However, don’t limit yourself. Sometimes, a tan baseplate can represent a desert or a sandy beach, setting the stage for your entire landscape.
The Importance of Baseplates and Elevation
Baseplates are more than just foundations; they are the canvas upon which your landscape will come to life. Varying the height of your baseplates or using bricks to build up layers is crucial for creating realistic elevation changes. This technique helps avoid a flat, uninteresting terrain.
- Standard Baseplates: Ideal for flat plains, fields, or the base of larger structures.
- Raised Baseplates: Provide immediate elevation, excellent for hills or plateaus.
- Layered Bricks: Use 1xX or 2xX bricks to gradually increase height, forming gentle slopes or steep cliffs.
- Technic Bricks: Can be integrated for internal structural support in larger, elevated sections.
Understanding how to manipulate elevation allows you to sculpt the land, defining where rivers will flow or where mountains will rise. It’s about thinking in three dimensions from the very beginning of your project.
Color Palette and Texture
Realistic landscapes are not just about shape; they’re also about color and texture. Nature is full of subtle variations, and replicating this in Lego requires a thoughtful approach to your brick selection. Don’t be afraid to mix different shades of green for grass or various browns and grays for rocks.
Incorporating textured bricks, like those with grilles or studs on the side, can add visual interest and mimic natural surfaces. For instance, using dark tan and dark brown bricks with a rough texture can effectively represent rocky outcrops or dirt paths.
By focusing on these basic elements, you lay a strong groundwork for more advanced techniques. A well-planned base with varied elevation and a thoughtful color palette will make your Lego landscape instantly more believable and engaging.
Crafting Mountains and Hills with Lego
Mountains and hills are iconic features of many natural landscapes, and building them realistically with Lego can add dramatic flair to your creations. The key is to avoid perfectly straight lines and sharp angles, mimicking the organic forms found in nature.
Start by sketching out the general shape of your mountain or hill on paper. This helps you visualize the contours and decide on the overall scale before you even pick up a brick. Remember, even the smallest hill can add significant depth.
Layering Techniques for Natural Slopes
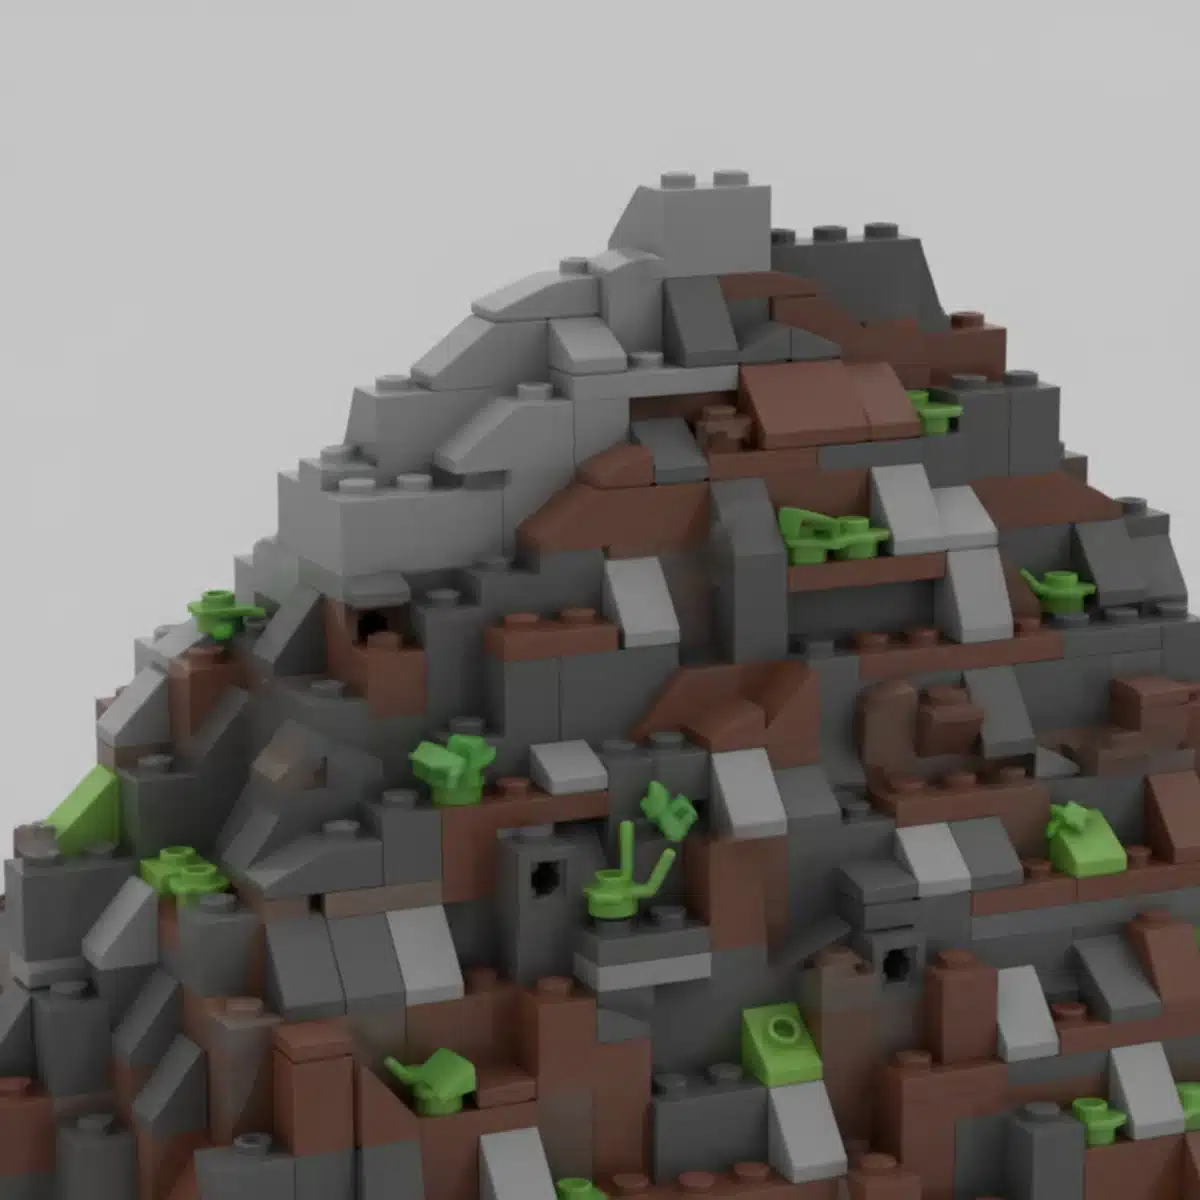
One of the most effective ways to build realistic mountains is through layering. Instead of stacking bricks straight up, use plates and bricks of varying sizes to create irregular, staggered layers. This technique naturally produces slopes and uneven surfaces.
- Stair-stepping: Gradually offset each layer of bricks inward to create a natural incline.
- SNOT (Studs Not On Top) Techniques: Use SNOT bricks to attach plates to the sides of your mountain, adding texture and allowing for more complex rock formations.
- Slope Bricks: Incorporate various slope bricks (e.g., 1×1, 1×2, 2×2, 2×4 slopes) to smooth out transitions and create more gradual inclines.
Mixing different shades of grey, brown, and even some dark green or blue-grey bricks can enhance the realism, suggesting different rock types, moss, or shadow. The more varied your color palette, the more lifelike your mountain will appear.
Adding Details: Peaks, Ridges, and Caves
Once the basic structure is in place, it’s time to add the finer details that truly bring a mountain to life. Peaks should be irregular and sharp, while ridges can be created by carefully stacking plates along the mountain’s edge. Don’t be afraid to leave some studs exposed to represent rough rock surfaces.
Caves and overhangs add an element of mystery and realism. These can be built by leaving gaps in the brickwork or using arches and inverted slopes. Consider adding small details like a waterfall cascading down a cliff face or a hidden path winding up the side. These small touches invite viewers to explore your landscape further.
Remember, mountains are rarely uniform. Experiment with different angles and heights to create a dynamic and visually interesting range. The goal is to make it look like it was formed by natural geological processes, not just stacked bricks.
By carefully layering bricks, utilizing SNOT techniques, and adding intricate details, you can construct impressive and realistic Lego mountains that become the focal point of your landscape. This attention to detail transforms a simple stack of bricks into a compelling natural wonder.
Designing Realistic Lego Water Features
Water is a dynamic element that can add incredible realism and movement to your Lego landscapes. Whether it’s a calm lake, a winding river, or a crashing waterfall, mastering Lego water techniques is essential for creating truly immersive scenes.
The secret lies in understanding how light interacts with transparent bricks and how to create the illusion of depth and flow. Planning the path of your water feature in advance will help you gather the right pieces and execute your vision effectively.
Lakes and Rivers: Creating Depth and Flow
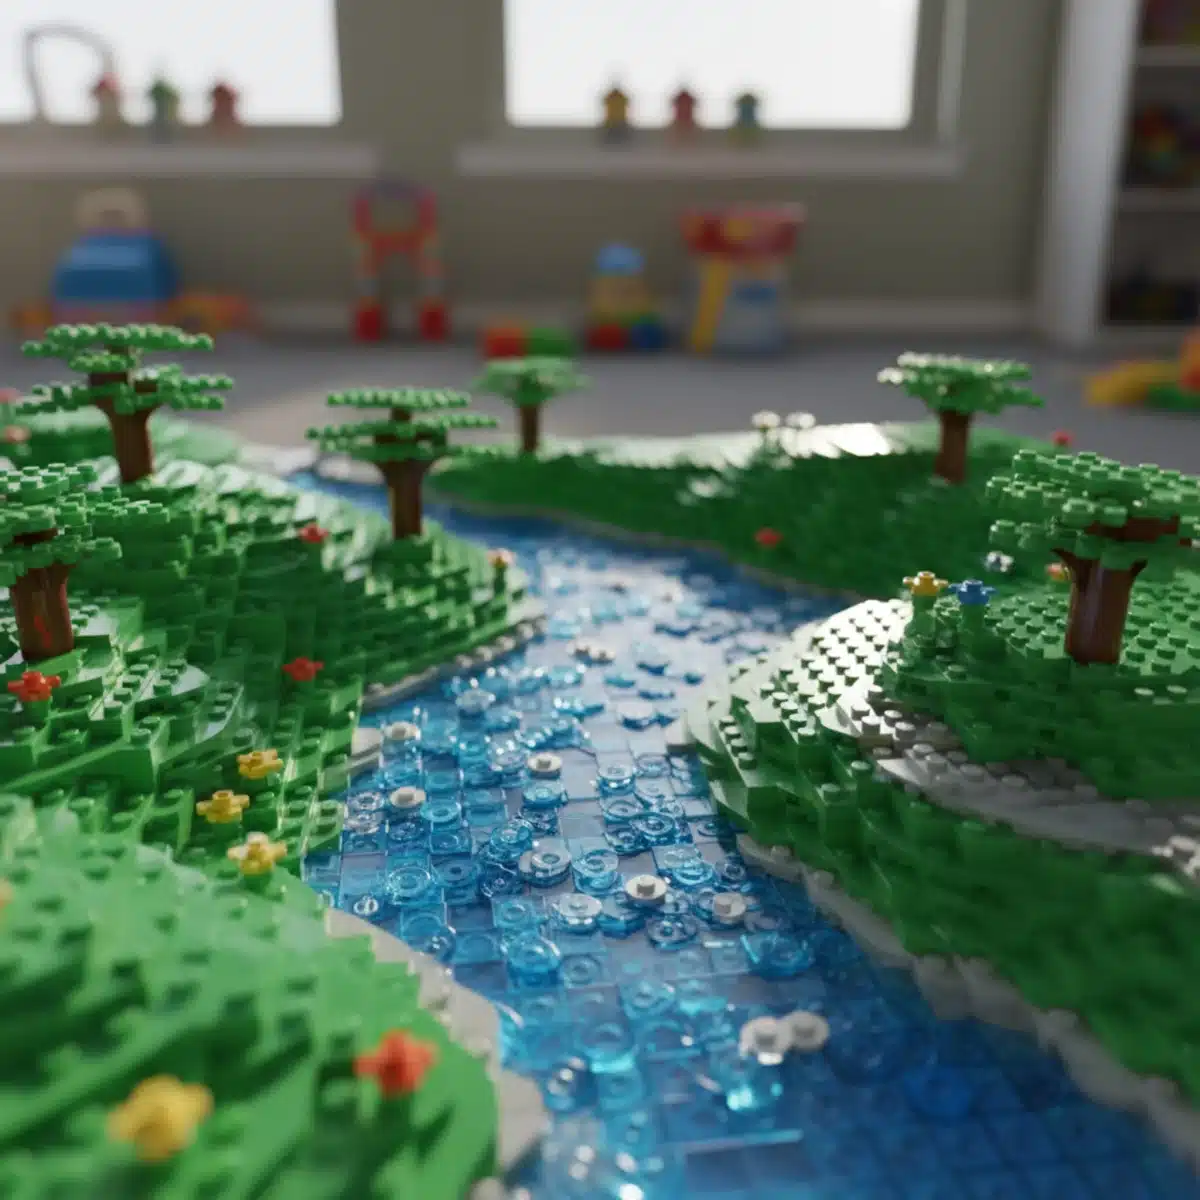
For lakes and rivers, transparent blue plates are your best friends. Using different shades of transparent blue (light blue, medium blue, dark blue) can simulate varying depths. Darker blues can suggest deeper water, while lighter blues might indicate shallows or reflections.
- Layering Transparent Plates: Stack transparent plates to create depth. A single layer looks like shallow water, while multiple layers give the impression of deeper water.
- Irregular Edges: Avoid straight lines for riverbanks. Use curved and irregular plates to mimic the natural flow of water.
- Underlying Colors: Place tan or brown plates beneath transparent blue ones to simulate a muddy riverbed, or dark grey for a rocky bottom.
- Trans-Clear Plates: Mix in trans-clear plates to create ripples or reflections on the water’s surface, especially near the edges.
The illusion of movement is crucial for rivers. Use small, round transparent blue studs or plates to create foam or rapids, especially around rocks or bends. This adds a sense of energy and realism to your flowing water.
Waterfalls and Ocean Waves: Dynamic Effects
Waterfalls are truly spectacular in Lego. To create a convincing waterfall, use clear or trans-blue bricks and plates stacked vertically, often with some white elements to represent foam and spray at the bottom. The key is to make it look like the water is actually falling.
Ocean waves require a different approach. Use a combination of trans-blue and white bricks and plates, building up layers to create the crests and troughs of waves. Sloped pieces can be particularly effective in shaping the curve of a breaking wave. Small white round plates or cheese slopes can mimic sea foam.
Consider the environment around your water feature. For a river, add green banks with small plants. For a waterfall, integrate it into a rocky mountain structure. These surrounding elements enhance the realism of the water itself.
By thoughtfully applying transparent elements, varying shades, and dynamic shaping techniques, you can bring vibrant and realistic water features to your Lego landscapes, adding a crucial layer of authenticity and visual appeal.
Incorporating Vegetation: Trees, Shrubs, and Grass
Vegetation is what truly brings a Lego landscape to life, adding color, texture, and a sense of natural growth. From towering trees to delicate shrubs and expansive grassy fields, mastering the art of Lego flora can transform your scene from good to spectacular.
The natural world is incredibly diverse, and your Lego creations should reflect that. Don’t stick to just one type of tree or one shade of green. Experimentation is key to achieving a truly realistic look.
Building Diverse Lego Trees
Lego offers a wide variety of tree elements, from pre-molded tree tops to individual leaf elements. Combining these can create incredibly diverse and realistic trees.
- Trunks: Use brown or dark tan round bricks or Technic pins for tree trunks. Varying the thickness and height makes them more natural.
- Branches: Incorporate smaller brown or tan plates and clips to create outstretched branches, allowing you to attach foliage precisely where you want it.
- Foliage: Mix different shades of green (dark green, bright green, lime green) and even some yellow or red for autumn colors. Use a combination of leaf plates, flower stems with leaves, and new ‘plant’ elements for varied textures.
- Tree Types: Don’t just build one type of tree. Create tall pines with dark green conical elements, bushy oaks with many leaf plates, or slender birches with light grey trunks and sparse foliage.
Consider the scale of your trees relative to the rest of your landscape. A giant tree might dominate a small scene, while a forest of smaller trees can create a dense, natural feel.
Creating Realistic Shrubs, Bushes, and Ground Cover
Beyond trees, smaller vegetation adds crucial detail. Shrubs and bushes can be made using clustered leaf elements, small green plates, or even the ‘seaweed’ pieces in green or dark green. Place them irregularly to avoid a uniform, artificial look.
For grass and ground cover, green baseplates are a good start, but they can be enhanced significantly. Sprinkle small 1×1 round plates or studs in various shades of green and even some tan or yellow to simulate wildflowers or dry patches. This breaks up the monotony and adds visual interest.
Using textured plates, like those with a grille pattern, underneath transparent green plates can also create an interesting grassy effect. The key is to layer and mix elements to mimic the organic imperfections of nature.
By paying attention to the details of your Lego vegetation, from the individual leaves on a tree to the tiny blades of grass, you can breathe life into your landscapes and create scenes that feel genuinely natural and inviting.
Paths, Roads, and Man-Made Structures
While the focus is on natural landscapes, realistic Lego terrains often include elements of human interaction. Paths, roads, and small structures like bridges or ruins can add narrative, scale, and functional elements to your scene, making it feel lived-in and explored.
These man-made features should integrate seamlessly with the natural environment, looking as though they belong there rather than being simply placed on top.
Designing Natural-Looking Paths and Roads
For dirt paths, use tan, dark tan, or dark brown plates. Avoid perfectly straight lines; natural paths often curve and meander. Varying the width of the path slightly can also enhance realism. If the path is well-trodden, it might be smoother, while a less-used trail could be rougher with exposed studs.
- Gravel Paths: Use small 1×1 round plates or tiles in light grey, dark grey, or tan, scattered loosely on a baseplate of a similar color.
- Stone Paths: Employ a mix of 1×1, 1×2, and 2×2 tiles in various shades of grey to simulate irregular flagstones.
- Paved Roads: Dark grey or black plates and tiles are ideal. Ensure smooth transitions and consider adding lane markings with white tiles or plates for a more realistic urban or suburban road.
- Weathering: Incorporate some ‘dirt’ or ‘moss’ (small green or brown studs) along the edges of paths and roads to show age and integration with nature.
Remember that paths and roads aren’t always flat. They should follow the contours of your terrain, gently sloping up hills or curving around obstacles. This integration is crucial for realism.
Integrating Bridges, Fences, and Ruins
Bridges are excellent for spanning rivers or ravines. They can be simple wooden structures made of brown plates and grille tiles, or more elaborate stone arches using arch bricks and textured elements. Ensure the bridge looks structurally sound, even if it’s just for show.
Fences can define boundaries or enclose areas. Simple picket fences can be made from white bars, while rustic fences might use brown plates and clips. Place them strategically to guide the eye or add a sense of enclosure.
Ruins add a touch of history and mystery. Partially collapsed walls, broken archways, or overgrown foundations can be built using grey or tan bricks, often with some green plates or vines (flex tubes) to show nature reclaiming the structure. The key is to make them look old and partially consumed by the environment.
By thoughtfully placing these man-made elements, you not only add intricate details but also create opportunities for storytelling within your Lego landscape, inviting minifigures and imaginations to explore further.
Advanced Techniques for Lego Landscape Detail
Once you’ve mastered the basics, it’s time to explore advanced techniques that can truly elevate your Lego landscapes. These methods involve pushing the boundaries of traditional building, using pieces in unconventional ways, and focusing on micro-details.
The goal is to move beyond simply stacking bricks and start thinking like a sculptor, constantly looking for ways to add organic flow and intricate realism to your terrain.
Micro-Detailing and Texturing
Micro-detailing involves using very small pieces to add texture and visual interest. This could be 1×1 round plates to represent pebbles on a beach, cheese slopes for jagged rock edges, or even minifigure accessories used as small plants.
- SNOT for Surface Variation: Employ SNOT bricks extensively to create vertical textures on cliffs, allowing you to attach tiles or plates sideways, mimicking stratified rock layers.
- Greebling: While often associated with sci-fi, greebling (adding small, intricate details) can be adapted for natural landscapes to create rough, organic textures on rocks or tree bark.
- Color Blending: Instead of solid blocks of color, blend similar shades (e.g., dark green, olive green, bright green) to create a more natural, dappled look for grass or foliage.
- Trans-Clear Elements: Beyond water, trans-clear elements can be used to simulate ice, dew drops, or even subtle atmospheric effects when placed strategically.
Don’t underestimate the power of small details. A single 1×1 plate in an unexpected color can break up monotony and add a surprising touch of realism to a larger surface.
Lighting and Perspective
While not strictly building techniques, understanding lighting and perspective can dramatically enhance how your Lego landscape is perceived. Good lighting can highlight textures, create shadows, and add depth, making your scene feel more alive.
Consider placing your landscape at eye level to create a more immersive experience. Using forced perspective, where objects further away are built at a smaller scale, can make your scene appear much larger than it actually is, creating a sense of vastness.
Adding small LED lights can simulate sunlight, moonlight, or even the glow of a campfire, bringing an entirely new dimension to your creation, especially for display. Experiment with different light sources and angles to see how they affect the mood and realism of your landscape.
By embracing micro-detailing, clever texturing, and an awareness of lighting and perspective, you can push your Lego landscape building to an advanced level, creating truly breathtaking and believable scenes that captivate anyone who sees them.
Maintaining and Displaying Your Lego Landscape
After investing so much time and creativity into building a realistic Lego landscape, it’s important to know how to maintain it and display it effectively. Proper care ensures longevity, and thoughtful presentation maximizes its visual impact, allowing others to fully appreciate your hard work.
A well-maintained and displayed landscape can be a source of pride and inspiration for years to come. Consider both short-term care and long-term preservation.
Cleaning and Dusting Your Creations
Dust is the arch-nemesis of any Lego builder. Over time, dust can settle into every crevice, dulling colors and making your landscape look less vibrant. Regular cleaning is essential.
- Soft Brush: A clean, soft-bristled paintbrush is excellent for gently dusting off surfaces without dislodging small pieces.
- Compressed Air: For hard-to-reach spots, a can of compressed air can blow away dust effectively. Hold it at a safe distance to avoid damaging delicate structures.
- Microfiber Cloth: For larger, flat surfaces, a slightly damp microfiber cloth can wipe away dust and grime. Ensure it’s not too wet to prevent water residue.
- Deep Cleaning (Rarely): For very dirty pieces, a gentle wash with mild soap and water is possible, but this should be a last resort and performed carefully, allowing pieces to dry completely.
It’s often easier to dust regularly than to undertake a major cleaning project. Keep your landscape covered when not on display if possible.
Effective Display Strategies
How you display your Lego landscape can significantly impact its appeal. A well-chosen location and presentation can make your creation shine.
Consider placing your landscape on a sturdy table or shelf where it’s easily visible but safe from accidental bumps. Backdrops, even simple ones like a plain blue or white sheet, can help your landscape stand out and focus attention on the build itself.
Adding subtle lighting, such as a small LED strip or a spotlight, can highlight key features and create a dramatic effect. If your landscape tells a story, arrange minifigures and accessories to emphasize that narrative, inviting viewers to engage with the scene.
For larger, more permanent displays, consider building a custom display case to protect against dust and curious hands. This not only preserves your work but also elevates it to a piece of art.
By taking these steps for maintenance and display, you ensure that your intricately built Lego landscape remains pristine and continues to inspire awe and imagination for a long time.
| Key Technique | Brief Description |
|---|---|
| Elevation & Layering | Using baseplates and staggered bricks to create varied heights and natural slopes for mountains and hills. |
| Water Features | Employing transparent blue plates and varied shades to simulate depth, flow, and dynamic effects for rivers and waterfalls. |
| Diverse Vegetation | Mixing various green elements, leaf types, and tree structures to build realistic forests, shrubs, and ground cover. |
| Micro-Detailing | Using small pieces and SNOT techniques to add intricate textures, subtle variations, and organic realism to surfaces. |
Frequently Asked Questions about Lego Landscapes
Essential pieces include various colored baseplates (green, tan, blue), slope bricks for natural inclines, transparent blue plates for water, and a wide assortment of green leaf and plant elements for vegetation. Don’t forget basic bricks and plates for structural elevation.
To achieve natural-looking mountains, use layering techniques by staggering bricks and plates, avoiding straight vertical stacks. Incorporate various slope bricks, SNOT (Studs Not On Top) techniques for side detailing, and blend different shades of grey and brown to mimic rock formations. Irregular peaks add realism.
For realistic water, use transparent blue plates in varying shades to simulate depth. Layer them for deeper water and use trans-clear plates for ripples. For rivers, create irregular banks. Waterfalls benefit from vertical stacks of clear or trans-blue bricks with white elements for foam at the base.
Create diverse vegetation by using different types of leaf elements, mixing various shades of green, and building different tree structures. Incorporate small plant elements for shrubs and bushes. For grass, combine green baseplates with scattered 1×1 round plates in various greens and tans.
Yes, you can use forced perspective by building elements further away at a smaller scale. Also, thoughtful lighting can create shadows and depth, making the scene appear more expansive. A well-designed backdrop can also enhance the illusion of a larger world beyond your physical build.
Conclusion
Building realistic Lego landscapes is a journey of creativity, patience, and learning to see the world through a brick-builder’s eyes. By applying the techniques discussed in this guide – from mastering elevation and water features to crafting diverse vegetation and integrating subtle details – you can transform simple plastic bricks into breathtaking, immersive worlds. Remember that every great landscape starts with an idea, and with the right approach, your Lego creations can tell incredible stories and inspire awe. Keep experimenting, keep building, and most importantly, keep having fun bringing your imaginative terrains to life.


