Minecraft Farming Guide: Optimize Crop Yields in 2025
Advertisements
Mastering Minecraft farming is crucial for survival and resource generation, with this 2025 guide detailing optimal crop selection, advanced automation techniques, and efficient farm layouts to maximize yields and build self-sustaining in-game economies.
Are you ready to transform your virtual world into a thriving agricultural empire? This Minecraft Farming Guide: Optimize Your Crop Yields in 2025 will equip you with the knowledge to cultivate bountiful harvests, ensuring a steady supply of food and valuable resources. Let’s dig in!
Anúncios
Understanding the Basics of Minecraft Farming
Before diving into advanced strategies, it’s essential to grasp the fundamental mechanics of farming in Minecraft. Successful cultivation hinges on several key factors: proper soil preparation, adequate hydration, and sufficient light. Ignoring any of these can significantly hinder your progress and reduce your yields.
The journey begins with tilling dirt blocks into farmland using a hoe. This prepared soil is where all crops, from wheat to beetroots, will be planted. However, tilled farmland will revert to dirt if not hydrated within four blocks of a water source. This hydration is vital for crop growth, making water placement a critical design consideration for any farm.
Anúncios
Essential Tools and Resources
To start your farming adventure, you’ll need a few basic items. A hoe is indispensable for tilling soil, and its durability varies depending on the material used. Seeds, of course, are the starting point for any crop. You’ll also need a reliable water source, which can be a single water block or an infinite water source created with two adjacent water blocks. Light sources, such as torches, glowstone, or sea lanterns, are crucial for crops to grow day and night.
- Hoe: Essential for tilling dirt into farmland.
- Seeds/Saplings: The foundation of any farm, varying by crop type.
- Water Source: Hydrates farmland for optimal growth.
- Light Sources:1 Ensures continuous growth, especially underground or at night.
Understanding these basic requirements forms the bedrock of efficient farming. As you progress, you’ll learn to integrate these elements into more complex and productive designs, paving the way for automated systems and maximizing your output.
Choosing the Right Crops for Your Needs
Minecraft offers a diverse array of crops, each with unique growth patterns, uses, and resource requirements. Selecting the right crops for your farm depends heavily on your immediate needs and long-term goals. Do you prioritize food, specific crafting ingredients, or trade opportunities?
Wheat, carrots, and potatoes are excellent early-game choices due to their ease of acquisition and direct food benefits. Wheat can also be used to breed animals, while carrots and potatoes are staple foods. As you advance, other crops like beetroot, pumpkins, and melons become viable, offering varied nutritional values and crafting possibilities.
Specialty Crops and Their Benefits
Beyond basic food items, Minecraft features several specialty crops that serve distinct purposes. Cocoa beans, found in jungle biomes, are used for crafting brown dye and cookies. Nether wart, exclusively found in the Nether, is a crucial ingredient for brewing potions. Bamboo and sugar cane are valuable for crafting and fuel, with bamboo being particularly fast-growing.
- Nether Wart: Essential for potion brewing, requires soul sand.
- Sugar Cane: Used for paper, books, and sugar, grows near water.
- Cocoa Beans: For brown dye and cookies, grows on jungle trees.
- Bamboo: Fast-growing, used for scaffolding, sticks, and fuel.
By carefully considering the utility of each crop, you can design a farm that not only sustains you but also provides valuable resources for crafting, trading, and enchanting. A balanced farm often includes a mix of staple foods and specialty items to cover all bases.
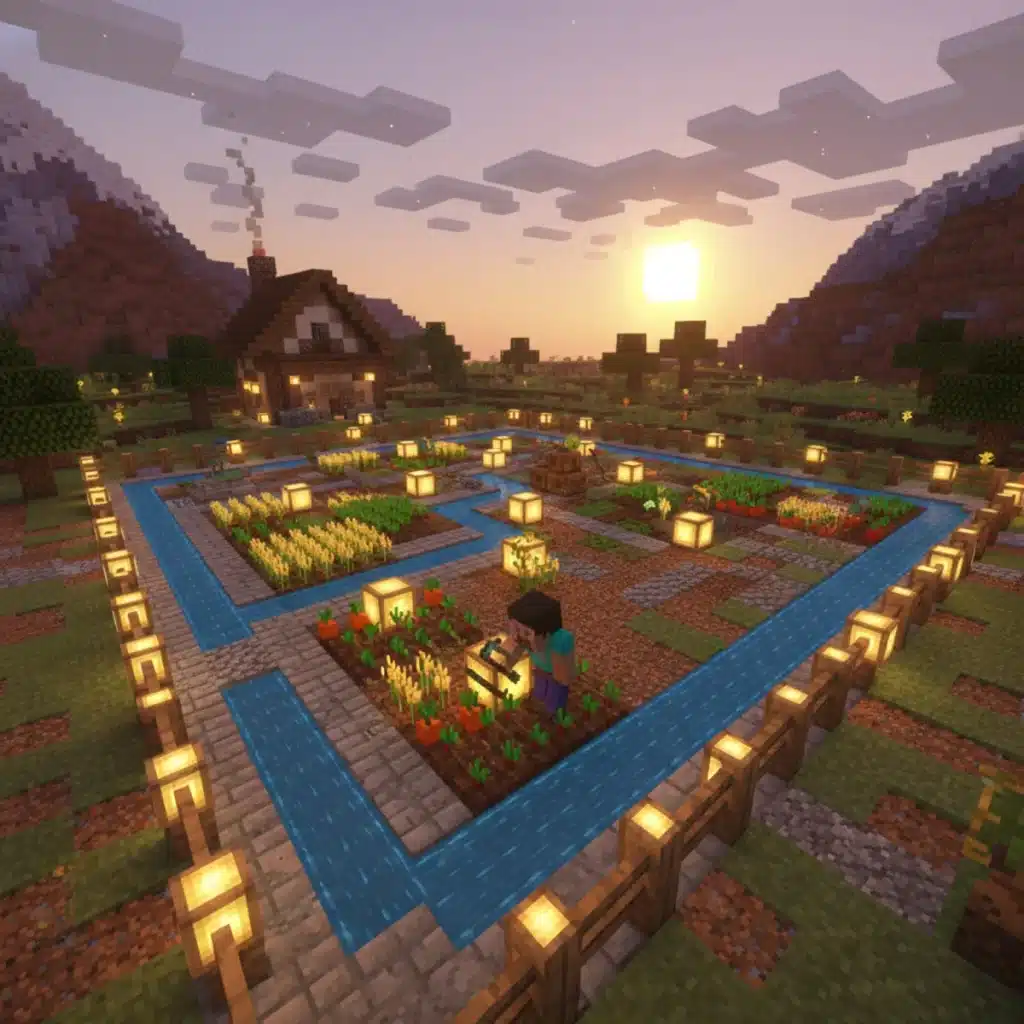
Designing Efficient Farm Layouts for Maximum Yields
The layout of your farm is paramount to its efficiency. A well-designed farm minimizes wasted space, optimizes water distribution, and facilitates easy harvesting. The goal is to maximize the number of crop blocks within a given area while ensuring every block is hydrated and receives sufficient light.
A common and highly efficient design involves a central water source block surrounded by farmland. Since water can hydrate farmland up to four blocks away horizontally, a 9×9 square with a water block in the center is highly effective. This layout covers 80 farmland blocks with a single water source, making it incredibly space-efficient.
Vertical Farming and Multi-Tiered Designs
When space is limited, or you simply want to impress, vertical farming is an excellent solution. By building multiple layers of farms stacked on top of each other, you can significantly increase your yields without expanding horizontally. Each layer functions independently, requiring its own water and light sources.
Multi-tiered farms often incorporate water streams for automated harvesting, directing harvested items to a central collection point. This design principle can be applied to almost any crop, from basic wheat fields to more complex pumpkin and melon farms. Careful planning of water flow and access points is crucial for smooth operation.
- 9×9 Grid: Most efficient use of a single water block for 80 farmland blocks.
- Vertical Stacking: Maximizes yield in limited horizontal space.
- Layered Design: Each layer requires independent hydration and lighting.
- Automated Collection: Integrate water streams and hoppers for efficient harvesting.
Optimal farm design is a blend of aesthetics and practicality. Experiment with different layouts to find what works best for your resources and playstyle, always keeping hydration, light, and accessibility in mind to ensure your crops thrive.
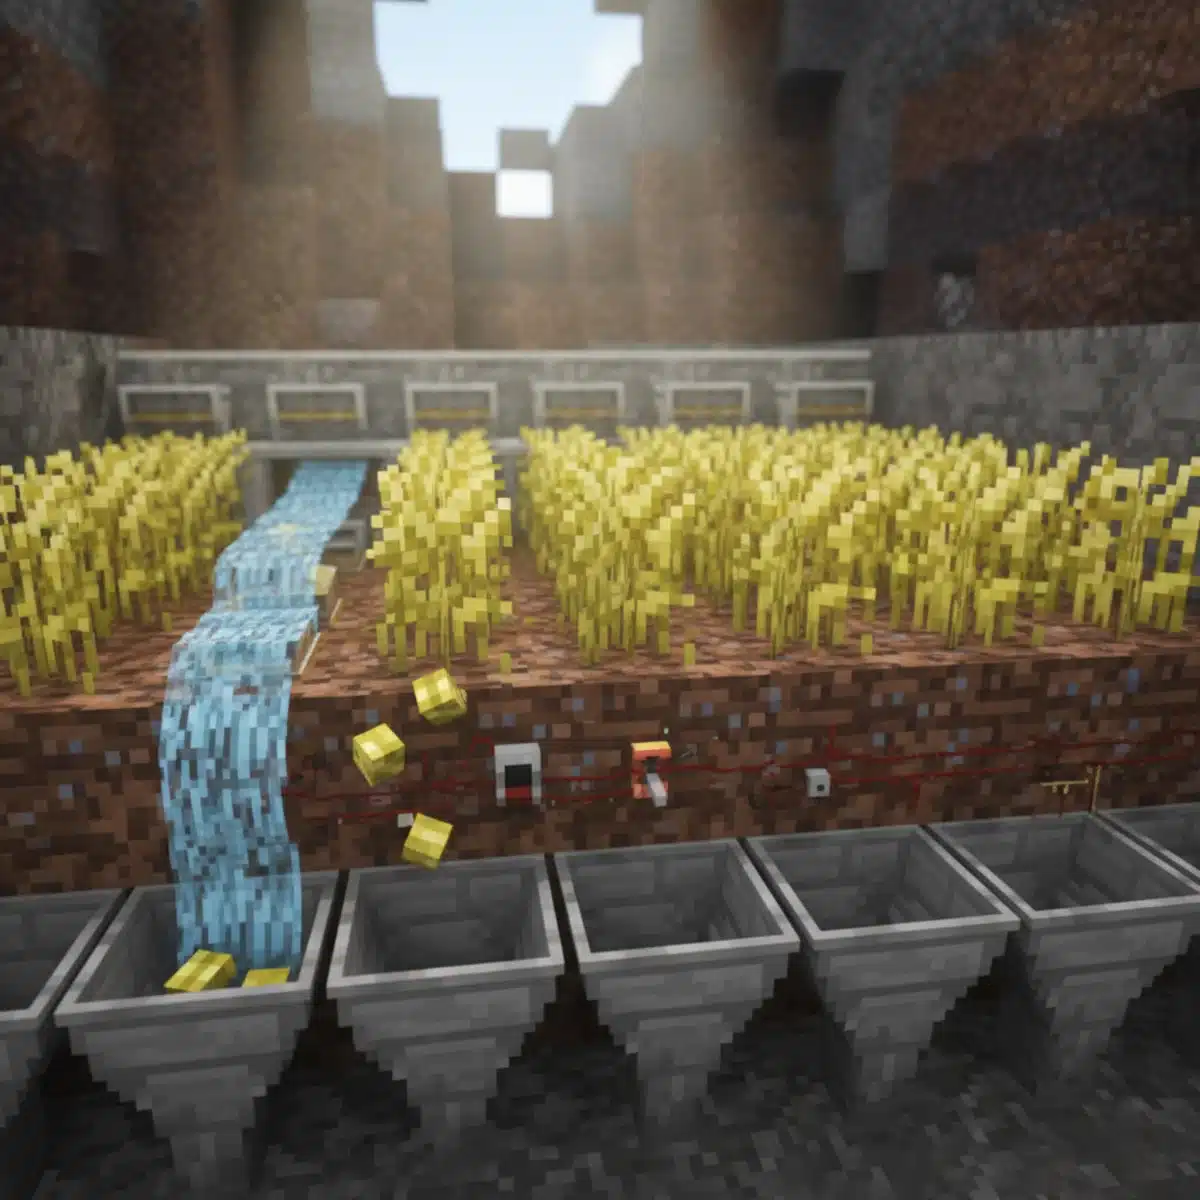
Automating Your Farms with Redstone and Villagers
As your Minecraft world grows, manual farming can become tedious and time-consuming. This is where automation shines. By leveraging Redstone mechanics and the industriousness of villagers, you can create farms that harvest and replant crops with minimal player intervention, freeing you up for other adventures.
Redstone is the backbone of most automated farms. Simple Redstone circuits can activate pistons to push water, harvesting crops like wheat, carrots, and potatoes instantly. These harvested items can then be collected by hoppers leading into chests, creating a continuous loop of production and storage.
Villager Farmers: Your Unpaid Workforce
Villagers, particularly those with a farmer profession, can be incredibly valuable assets to your automated farms. A farmer villager will tend to crops within their assigned area, harvesting mature crops and replanting new seeds. They can even share food with other villagers, contributing to population growth.
- Redstone Circuits: Power pistons for automated harvesting.
- Hoppers and Chests: Collect and store harvested items.
- Farmer Villagers: Harvest and replant crops automatically.
- Composters: Villagers use these to produce bone meal, enhancing growth.
To create an effective villager farm, you’ll need to set up a designated farming area, provide a composter for the villager to claim their profession, and ensure they have access to seeds. You might also want to include a collection system for the items they drop. Combining Redstone automation with villager labor is the pinnacle of efficient Minecraft farming, providing a steady stream of resources without constant player input.
Advanced Techniques for Boosting Crop Growth
While basic farming principles are crucial, several advanced techniques can significantly accelerate crop growth and further optimize your yields. These methods often involve manipulating game mechanics to create ideal growing conditions, leading to faster harvests and greater efficiency.
One of the most effective ways to boost growth is by using bone meal. Crafted from bones, bone meal can be applied directly to crops to instantly advance their growth stage. This is particularly useful for quickly cultivating specific resources or for jump-starting a new farm. Automated bone meal dispensers can even be integrated into Redstone farms for continuous acceleration.
Optimizing Light and Hydration Beyond the Basics
Beyond simple water blocks, understanding advanced hydration techniques can make a big difference. Waterlogged blocks, such as slabs or stairs with water inside them, can hydrate farmland while allowing players to walk over them or place other blocks on top. This maintains hydration without taking up valuable surface space.

Similarly, optimizing light isn’t just about placing torches. Using glowstone or sea lanterns embedded within the farm floor or ceiling provides consistent light without obstructing growth or aesthetics. For specific crops like nether wart, understanding their unique light requirements (or lack thereof) is key. Nether wart grows in any light level, but only on soul sand.
- Bone Meal: Instantly advances crop growth, can be automated.
- Waterlogged Blocks: Hydrate farmland without occupying surface space.
- Integrated Lighting: Glowstone or sea lanterns for consistent, unobtrusive light.
- Biome-Specific Growth: Some crops grow faster in certain biomes (e.g., sugar cane in warm biomes).
By implementing these advanced techniques, you move beyond mere sustenance farming into a realm of agricultural mastery. Your farms will produce resources at an unprecedented rate, supporting all your Minecraft endeavors.
Protecting Your Farms from Mobs and Environmental Hazards
A thriving farm is a magnet for both productive villagers and destructive mobs. Protecting your valuable crops from unwelcome visitors and environmental threats is an essential aspect of farm management. Neglecting security can lead to significant losses and setbacks.
The most common threat comes from hostile mobs that spawn at night or in dark areas. Zombies, skeletons, and creepers can trample crops, destroy blocks, and generally wreak havoc. Adequate lighting is your first line of defense, preventing hostile mobs from spawning within your farm’s perimeter.
Fencing, Walls, and Golem Guards
Beyond lighting, physical barriers are crucial. Fences or walls around your farm can prevent most ground-based mobs from entering. For added security, consider a two-block-high wall, as some mobs, like spiders, can climb over single-block fences. Iron golems, when created, will patrol your farm and aggressively defend villagers and crops from hostile mobs, making them an excellent security investment.
- Adequate Lighting: Prevents hostile mob spawns within the farm.
- Fences/Walls: Physical barriers to keep mobs out.
- Iron Golems: Powerful defenders against hostile creatures.
- Trapdoors/Slabs: Can deter mobs from trampling crops in specific areas.
Environmental hazards, such as accidental player damage or griefing on multiplayer servers, also need consideration. Designing your farm with pathways and clear boundaries can minimize accidental crop destruction. On public servers, creating a protected claim around your farm is paramount. By taking proactive measures, you can ensure your hard-earned crops remain safe and continue to flourish.
Future-Proofing Your Minecraft Farms for 2025 and Beyond
Minecraft is an ever-evolving game, with updates frequently introducing new blocks, mechanics, and even crops. To ensure your farms remain efficient and relevant in 2025 and beyond, it’s vital to adopt a mindset of adaptability and continuous improvement. Staying informed about new updates and experimenting with fresh designs will keep your agricultural operations at the cutting edge.
One key aspect of future-proofing is building modular farms. Instead of one massive, monolithic farm, consider smaller, specialized units for different crops. This makes it easier to upgrade or modify individual sections without disrupting your entire operation. For instance, if a new crop is introduced with unique growth requirements, a modular design allows you to integrate it seamlessly.
Embracing New Redstone Components and Game Mechanics
As Redstone technology advances within Minecraft, new components and interactions become available. Keep an eye on community innovations and official update notes for new ways to automate and optimize. Perhaps a new block will simplify complex Redstone circuits, or a new mob interaction could lead to novel farming strategies.
- Modular Design: Allows for easy upgrades and integration of new crops.
- Stay Updated: Keep track of Minecraft updates for new mechanics and blocks.
- Community Research: Learn from other players’ innovative farm designs.
- Experimentation: Don’t be afraid to try new approaches and optimize existing ones.
Furthermore, consider the long-term sustainability of your farms. Are they resource-intensive to maintain? Can they self-replenish certain components? By thinking ahead and designing with flexibility in mind, your Minecraft farms will not only thrive in 2025 but continue to be productive and enjoyable for years to come, adapting to whatever new challenges and opportunities the game presents.
| Key Point | Brief Description |
|---|---|
| Efficient Layouts | Utilize 9×9 water grids and vertical designs to maximize crop density. |
| Automation | Implement Redstone mechanics and villager farmers for hands-free harvesting and replanting. |
| Growth Boosters | Use bone meal and optimized light/hydration for accelerated crop development. |
| Farm Security | Protect crops from mobs with lighting, fences, and iron golems. |
Frequently Asked Questions About Minecraft Farming
For new Minecraft players, wheat, carrots, and potatoes are ideal early-game crops. They are easy to find, provide essential food, and can be quickly harvested. Wheat is also useful for breeding animals, while carrots and potatoes offer good nutritional value for survival.
Water is crucial for crop growth in Minecraft as it hydrates farmland. Tilled farmland will revert to dirt if not within four blocks of a water source. Hydrated farmland allows crops to grow faster, making strategic water placement vital for efficient farm designs and maximum yields.
Yes, farming can be extensively automated in Minecraft using Redstone and villagers. Redstone circuits can activate pistons to harvest crops with water, while hoppers collect items. Farmer villagers can also automatically harvest and replant crops within a designated area, freeing players for other tasks.
Vertical farming is highly beneficial in Minecraft, especially when horizontal space is limited. By stacking multiple layers of farms, you can significantly increase your overall crop yield without needing a large footprint. This design is space-efficient and can be integrated with automated collection systems.
Protecting your farm from hostile mobs is essential. Ensure adequate lighting throughout and around your farm to prevent mob spawns. Fences or walls can create physical barriers, and deploying iron golems will provide active defense, attacking any hostile creatures that threaten your crops or villagers.
Conclusion
Mastering the art of farming in Minecraft is a rewarding endeavor that significantly enhances your survival and creative capabilities. By understanding the core mechanics, choosing the right crops, designing efficient layouts, embracing automation, and implementing advanced growth techniques, you can transform a simple plot of land into a highly productive agricultural powerhouse. As Minecraft continues to evolve, staying adaptable and informed will ensure your farms remain future-proof, providing a steady stream of resources for all your adventures. Happy farming, and may your yields be bountiful!


