Advertisements
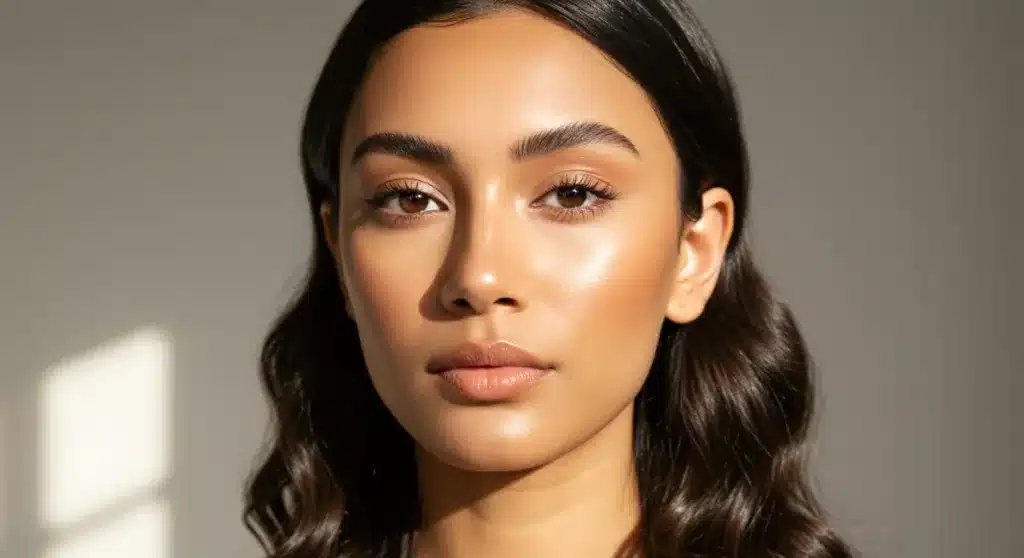
The no-makeup makeup look is a technique that enhances natural beauty using minimal products applied strategically to create a fresh, radiant appearance. This guide covers seven essential steps including skincare prep, lightweight foundation, subtle contouring, and natural-looking enhancements that deliver effortlessly beautiful results.
Anúncios
The no-makeup makeup look has become one of the most sought-after beauty techniques in the United States. Unlike heavy contouring or dramatic eye makeup, this approach focuses on enhancing your natural features while appearing virtually untouched. The key lies in understanding which products work together and how to apply them in a way that feels authentic rather than constructed. Whether you’re heading to a casual brunch, a professional meeting, or simply want to look polished without announcing to the world that you spent an hour in front of the mirror, mastering this technique offers incredible versatility. The beauty of this look is that it works for every skin type, age, and occasion, making it an essential skill for anyone interested in looking their best while maintaining that coveted “I just woke up like this” aesthetic.
Understanding the Philosophy Behind No-Makeup Makeup
The no-makeup makeup look operates on a fundamental principle: enhance rather than transform. This philosophy distinguishes it from traditional makeup application where the goal often involves creating a completely different appearance. Instead, this technique celebrates your natural bone structure, skin texture, and facial features while addressing specific concerns that might otherwise diminish your confidence. The approach requires a different mindset than conventional makeup routines, emphasizing restraint and precision over abundance and layering.
Anúncios
Understanding why this look has gained such popularity reveals important insights about modern beauty standards. Today’s trends increasingly value authenticity and individuality, making the no-makeup aesthetic particularly appealing. People want to look like the best version of themselves, not like someone else entirely. This approach also proves more practical for daily wear, requiring less time investment while still providing that polished, put-together appearance that helps many people feel more confident and ready to face their day.
Key Principles That Guide This Technique
- Prioritize skin health over coverage density
- Work with your natural features rather than against them
- Use products that blend seamlessly with your skin tone
- Focus on creating a healthy, radiant appearance
- Maintain proportionality across all facial features
The execution of these principles requires patience and practice. You won’t achieve the perfect no-makeup look on your first attempt, and that’s completely normal. The learning process involves understanding how different products interact with your specific skin type and undertones. Some days your skin might need more hydration, while other days you might want to emphasize certain features more than usual. Flexibility and observation become your greatest allies in mastering this technique.
Step One: Preparing Your Canvas
Before any makeup touches your face, proper skincare preparation determines the success of your entire look. The no-makeup makeup style requires an exceptionally smooth canvas because there’s nowhere to hide texture or dry patches. This means your skincare routine deserves as much attention as the makeup application itself. Cleansing, exfoliating, and moisturizing create the foundation upon which everything else builds.
Consider your skin’s specific needs when selecting preparation products. Those with oily skin might benefit from lightweight, oil-free moisturizers that control shine throughout the day. Dry skin types require richer, more hydrating formulas that prevent flaking and create that coveted dewy appearance. Combination skin often needs targeted approaches for different face zones. The goal is achieving balanced, nourished skin that looks healthy and vibrant even without product coverage.
Essential Skincare Steps
- Gentle cleansing to remove impurities without stripping natural oils
- Exfoliation 2-3 times weekly to maintain smooth texture
- Hydrating serum application for plump, healthy-looking skin
- Moisturizer appropriate for your skin type
- Primer only where necessary, focusing on pores and fine lines
Allow your skincare products adequate time to absorb before applying makeup. Rushing this process leads to pilling, separation, and an uneven application that defeats the entire purpose of the no-makeup look. Typically, waiting five to ten minutes after your final skincare step provides sufficient absorption time. If you’re short on time, lightly pressing a tissue against your face removes excess product without compromising your skincare benefits.
Step Two: Choosing the Right Base Products
The foundation you select makes or breaks the no-makeup makeup look. Traditional full-coverage foundations appear cakey and obvious, completely undermining the aesthetic you’re trying to achieve. Instead, opt for lightweight, buildable formulas that provide sheer to medium coverage while allowing your natural skin to show through. Tinted moisturizers, serum foundations, and breathable BB creams have become the go-to choices for this technique.
Color matching proves particularly crucial for this look. The foundation should disappear into your skin rather than creating a visible line along your jaw or hairline. Test potential matches on your jawline in natural lighting, as this area often matches both your face and neck most accurately. Consider undertones carefully—many people assume they need pink or yellow undertones when they actually have neutral undertones that work with both warm and cool shades.
Finding Your Perfect Match
- Test on jawline in natural daylight for accuracy
- Look for formulas with skincare benefits
- Choose buildable coverage over high coverage
- Consider your skin’s current condition and needs
- Select finishes that complement your skin type
Application technique matters just as much as product selection. For the most natural result, apply foundation with clean fingers, using gentle patting and pressing motions rather than rubbing or sweeping. This technique warms the product and presses it into your skin rather than sitting on top, creating that seamless, second-skin finish that defines the no-makeup look. If you prefer brushes or sponges, use them with a light hand and focus on areas that actually need coverage.
Step Three: Enhancing Your Natural Complexion
Beyond basic foundation, achieving that coveted glow requires strategic highlighting and color enhancement. The no-makeup look isn’t about being flat or matte—it’s about looking healthy, vibrant, and alive. Strategic use of luminous products creates dimension while maintaining that natural appearance. The key lies in placement: highlight where light naturally hits your face and where you want to create the illusion of underlying radiance.
Cream blushes and bronzers offer the most natural-looking results for this aesthetic. Powder products can appear too heavy or obvious, especially in photography or harsh lighting. Apply cream products with your fingertips, blending upward and outward toward your temples. Focus blush on the apples of your cheeks, extending slightly toward your ears for that natural flush effect. Bronzer belongs in the hollows of your cheeks, along your hairline, and under your jawline for subtle dimension.
Placement Guidelines for Natural Enhancement
- Apply cream blush to the apples of cheeks, blending upward
- Use bronzer in areas where sun naturally hits your face
- Highlight cheekbones, brow bones, and the bridge of your nose
- Keep all products within one shade of your natural coloring
- Blend thoroughly to avoid harsh lines or patches
The goal is creating a healthy, slightly flushed appearance as if you’ve just come in from a walk in the cold or are slightly flushed from activity. Avoid the temptation to over-apply—building color gradually proves far more effective than trying to blend out too much product. Remember, you can always add more, but removing excess product often proves challenging without starting over.
Step Four: Defining Eyes Naturally
Eyes often receive too much attention in traditional makeup application, but the no-makeup look calls for a gentler approach. The objective is making your eyes appear awake, bright, and slightly enhanced without announcing their presence across the room. This doesn’t mean neglecting your eyes—it means treating them with a lighter touch that respects their natural shape and your overall aesthetic.
Start with grooming your brows, as well-shaped brows frame your face and provide essential structure. Fill in sparse areas with a lightweight pomade or pencil that matches your natural brow color, focusing on creating shape rather than drawing entirely new brows. Brush through with a spoolie to blend and remove harsh lines. The result should look polished but unmistakably natural, as if you’ve simply tamed your brows into submission rather than completely reshaping them.
Eye Enhancement Techniques
- Use neutral, matte shadows close to your skin tone
- Apply mascara focusing on root length rather than volume
- Keep eyeliner minimal or skip entirely
- Consider clear brow gel for taming rather than coloring
- Use white or nude pencil on waterline for brightness
Mascara application deserves special attention in the no-makeup look. Rather than dramatic volume or length, focus on defining your lashes to open your eyes without looking made-up. Apply mascara starting at the roots, wiggling the wand slightly as you move toward the tips. This technique separates and defines rather than clumping, creating that wide-eyed, fresh appearance. Consider tubing mascaras, which wrap each lash in a flexible polymer that creates length and definition while washing off easily with warm water.
Step Five: Creating Dimension with Subtle Contouring
Contouring remains controversial in the no-makeup makeup world, but when executed properly, it provides beautiful dimension that enhances your natural bone structure without appearing theatrical. The difference between contouring for the no-makeup look and dramatic contouring lies in product choice, placement, and intensity. We’re not creating a completely different face—we’re simply emphasizing what already exists.
Cool-toned, matte bronzers or contour powders work best for this technique. Warm, orange-toned bronzers appear too obvious and unnatural on most skin tones. Apply contour in the hollows of your cheeks, along your hairline, under your jawline, and on the sides of your nose. The goal is creating shadows that mimic natural light and shadow, not carving out entirely new facial structure. Blend thoroughly—any harsh lines immediately betray the no-makeup aesthetic.
Contour Placement for Natural Results
- Apply to hollows of cheeks for cheekbone definition
- Contour along hairline to frame your face
- Define jawline by contouring underneath
- Add subtle shadow to sides of nose for slimming effect
- Keep intensity minimal—subtlety is everything
Many people discover they don’t need contour at all, especially if they’re using bronzer strategically. Others find that a very light hand provides the perfect amount of dimension. Experiment to discover what works for your specific face shape and personal preferences. Some of the most beautiful no-makeup looks skip contour entirely, relying instead on strategic highlighting and blush placement to create dimension.
Step Six: Perfecting Your Lips
Lips require special attention in the no-makeup makeup look because they’re often the first place people notice color. The objective is natural, healthy-looking lips that appear hydrated and slightly enhanced rather than obviously painted. This doesn’t mean neglecting your lips—it means treating them with products that enhance their natural beauty without creating obvious makeup texture.
Exfoliation proves essential for smooth, polished lips that hold product beautifully. Dry, chapped lips immediately undermine even the most perfectly executed no-makeup look. Regular exfoliation with a gentle lip scrub removes dead skin cells and creates that smooth canvas necessary for seamless product application. Follow with a hydrating lip balm that primes your lips for whatever comes next.
Lip Enhancement Options
- Tinted lip balms for subtle, hydrating color
- Lip oils that provide shine and natural tint
- Cream lipsticks in nude or MLBB shades
- Lip stains for long-lasting, natural color
- Clear gloss for healthy-looking shine
Select lip colors that complement your natural lip coloring rather than creating an obviously different shade. MLBB (My Lips But Better) shades have earned their popularity for good reason—they enhance your natural lip color in a way that appears effortless. Apply product from the center outward, pressing the color into your lips rather than swiping across. This technique creates more natural coverage that fades gracefully toward your lip line.
Step Seven: Setting and Finishing Touches
The final step in achieving a long-lasting no-makeup makeup look involves setting your work and adding those finishing touches that elevate everything from good to extraordinary. This step often determines how well your look holds up throughout the day and whether it maintains that fresh, natural appearance or breaks down into something less flattering. Attention to these final details separates those who master this technique from those who merely attempt it.
Setting sprays have become essential tools in the no-makeup makeup arsenal. They melt products together, remove any powdery residue, and create a finish that appears completely natural while extending wear time. Hold the spray several inches from your face and mist in an X pattern, allowing the product to air dry rather than rubbing or touching your face. The result is that seamless, skin-like finish that makes everyone wonder what your secret is.
Finishing Techniques
- Use setting spray to meld products together
- Apply translucent powder only where necessary
- Check lighting to ensure natural appearance
- Press rather than rub to remove any excess product
- Step back and assess your look from a distance
Before leaving your preparation space, step back and assess your look in full-length mirror from several feet away. This distance reveals how your makeup appears to others and helps identify any areas requiring adjustment. Look for anything that appears too heavy, too dark, or too obvious. Make corrections as needed, always erring on the side of less rather than more. The no-makeup look rewards restraint more than any other makeup technique.
| Step | Description |
|---|---|
| Canvas Preparation | Cleanse, exfoliate, and hydrate skin thoroughly before applying any makeup |
| Base Products | Choose lightweight, buildable formulas like tinted moisturizer or serum foundation |
| Complexion Enhancement | Apply cream blush and bronzer for healthy, natural-looking glow |
| Finishing Touches | Set with spray and assess overall appearance for natural balance |
Frequently Asked Questions
Tinted moisturizers, serum foundations, and BB creams provide the best results for this look. These formulas offer lightweight, buildable coverage that blends seamlessly with your natural skin while allowing your complexion to show through. Look for products labeled as “sheer coverage” or “natural finish” to achieve that effortlessly beautiful appearance.
Once you’ve mastered the technique, a complete no-makeup makeup look takes approximately 10-15 minutes. The process involves skincare preparation, base application, strategic color enhancement, and finishing touches. With practice, you’ll develop muscle memory that speeds up your routine significantly while maintaining that polished, natural appearance.
Absolutely. The no-makeup makeup look works beautifully for weddings, formal events, and professional occasions. The key is adjusting product intensity and longevity to ensure your look holds up throughout the event. Use longer-wearing formulas and don’t skip the setting spray. Many brides specifically request this look because it photographs beautifully and appears timeless in pictures.
Heavy full-coverage foundations, dramatic contour kits, false lashes, and bold lip colors work against the no-makeup aesthetic. Matte products that create a completely flat appearance also undermine the healthy, radiant look you’re trying to achieve. Instead, focus on products that enhance your natural beauty rather than transforming your appearance entirely.
Start with well-prepped skin and use long-wearing formulas for your base. Apply a setting spray after completing your look and reapply it throughout the day if needed. Touch up only areas that require attention rather than reapplying entire sections. Keeping a small tinted lip balm or cream blush for quick refreshes helps maintain that fresh appearance without overdoing it.
Conclusion
Mastering the no-makeup makeup look requires understanding that less truly equals more when it comes to enhancing your natural beauty. Each of the seven steps contributes to creating that effortlessly polished appearance that appears completely natural while addressing your specific skin concerns and features. The technique rewards practice, patience, and a willingness to embrace your natural beauty rather than attempting to transform it entirely. By following these essential steps and maintaining attention to quality products and proper application, you can achieve that coveted fresh-faced look that works for every occasion and makes everyone wonder what your secret really is.